Website
- Dashboard
- How to view a vehicle on the map?
- How to replay the route of a vehicle?
- How to export a replay route of a vehicle?
- How to Immobilise/mobilise or door lock/unlock a vehicle?
- How to see the movement history for a day?
- How to create a geofence?
- How to view a geofence on the map?
- How to edit a geofence?
- How to view an asset on the map?
- Assets
- Vehicles
- How to edit a vehicle's information?
- How to add a vehilce to a group?
- What is Driver Authentication?
- How to assign a key to a vehicle?
- How to immobilise a vehicle from the vehicles page?
- Geofences
- What are geofences?
- How to assign vehicles to a geofence?
- How to delete a geofence?
- How to add a geofence to a group?
- How to change notification time for a vehicle inside a geofence?
- Alerts
- What are alerts?
- How to create a alert?
- How to assign vehicles to an alert?
- How to delete an alert?
- How to add an alert to a group?
- How to edit an alert?
- How to remove one vehicle from an alert?
- Groups
- User Management
- How to add users or send an invite?
- How to change user's details?
- I send invite to wrong email, what do I do?
- How to send a password reset email?
- How to add a user to a group?
- How to delete a user?
- Reports
- How to export a report to pdf or csv?
- What is Vehicle Summary report?
- What is a Movement Report?
- What is a Stationary Report?
- What is a Alert Report?
- What is a Geofence Report?
- What is a Notifications Report?
- What is a Temperature Report?
- What is a Vehicle History Report?
- How to generate a report?
- How to filter results of a report?
- Account
- How to set your notification preferences?
- How to verify your mobile number?
- How to change company details including address and postal address?
- FAQ
Dashboard
How to view a vehicle on the map?
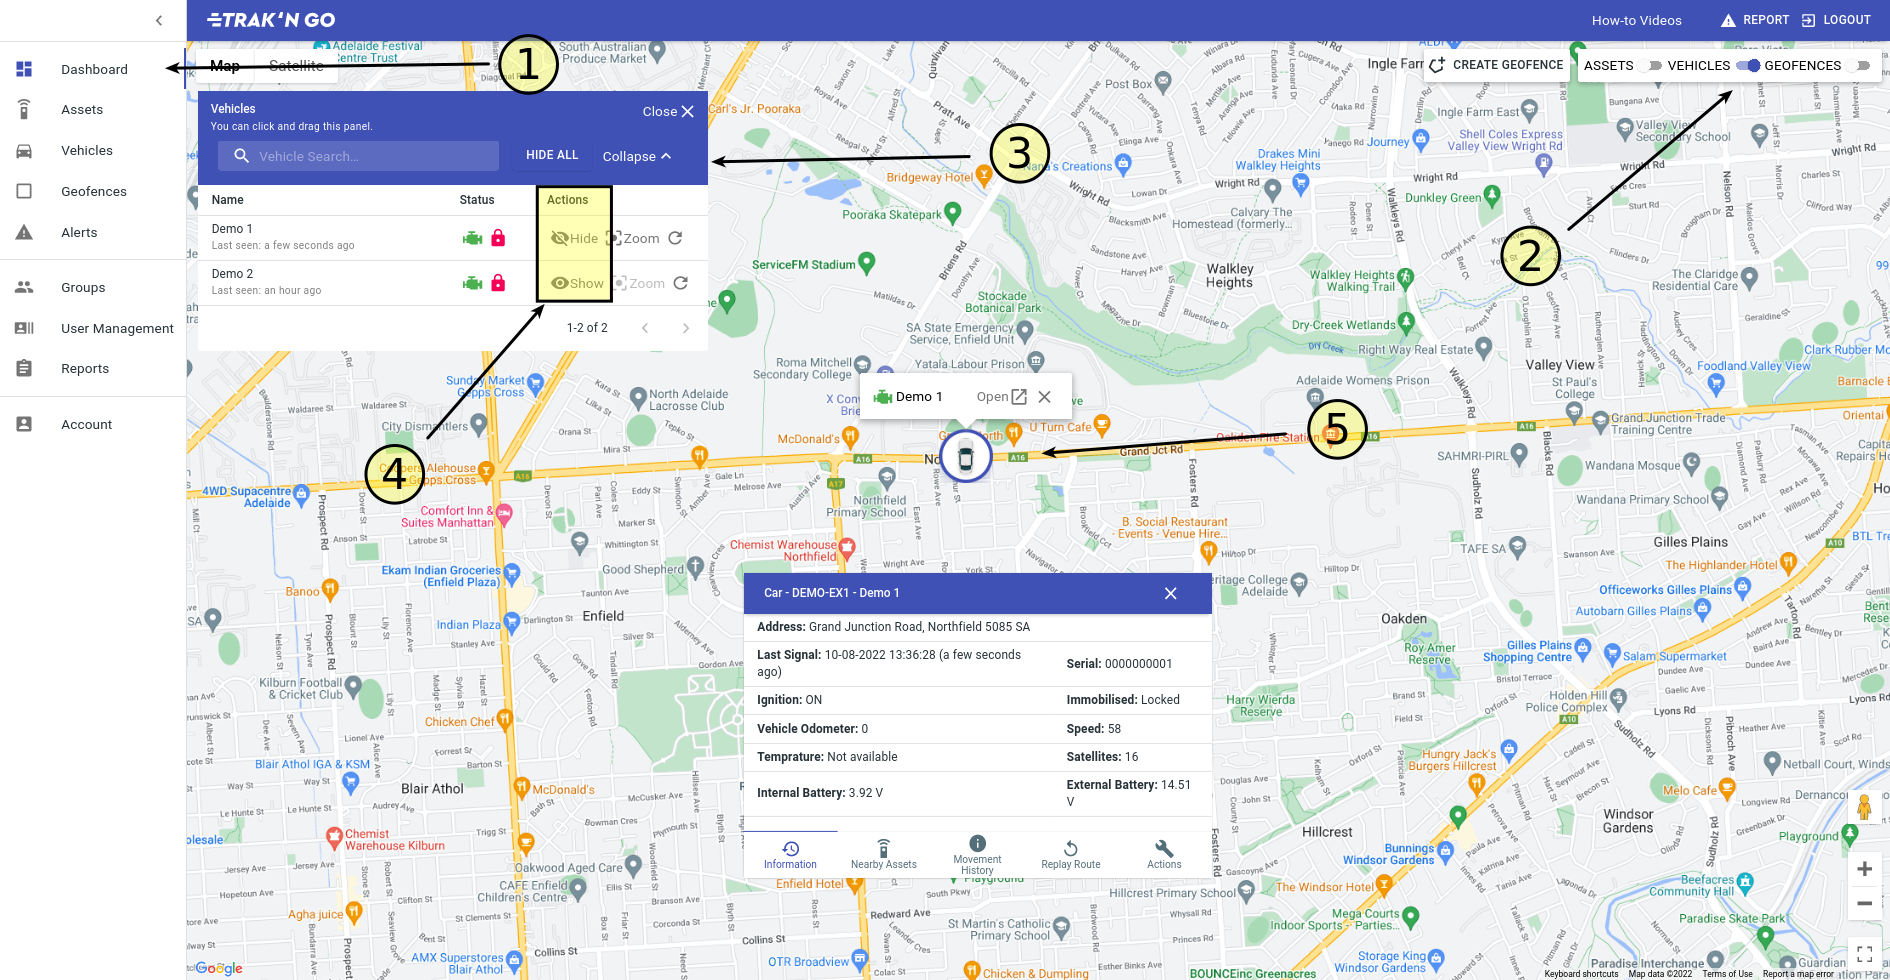
- Make sure you are on the dashboard page.
- Top right on the page, make sure that toggle for VEHICLES is on.
- You will see the vehicle panel. Click 'expand' to open the panel.
- Click the Show button on the vehicle you want to see.
- You will see the vehicle on the map.
How to replay the route of a vehicle?
Please follow this guide first - How to view a vehicle on the map?
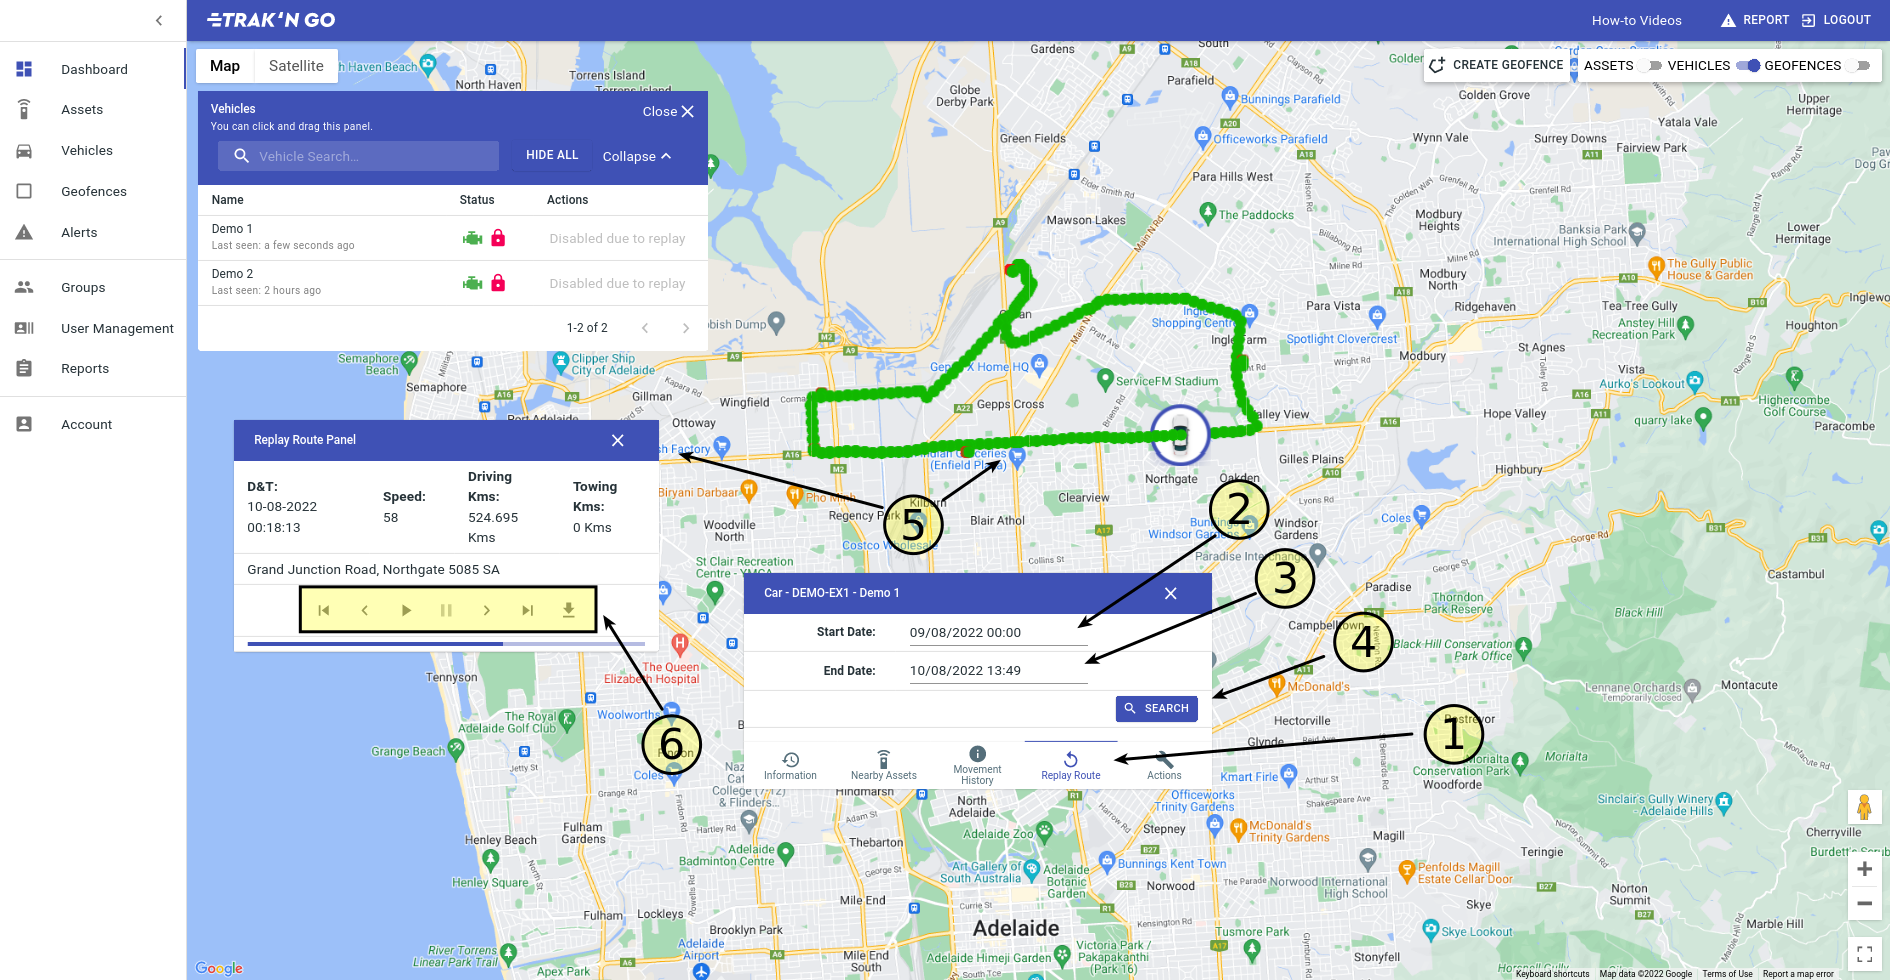
- Click the Replay route tab.
- Enter the start date for the replay.
- Enter the end date for the replay.
- Click Search.
- It will show the route of the replay on the map and it will bring up a replay route panel.
The replay route panel will show you the date&time, speed and address of the current position in the replay.
It will also show total driving and towing distance for the replay. - These are the controls for the replay. From left to right, there are:
Jump to start, previous position, play replay, pause replay, next position, jump to last and export replay to a spreadsheet.
Once you click play, you will see the fast forward feature. In the middle, you will see the current play speed. You can fast forward or slow down the replay speed using the two button.

How to export a replay route of a vehicle?
Please see the following guide - How to replay the route of a vehicle?
How to Immobilise/mobilise or door lock/unlock a vehicle?
Please follow this guide first - How to view a vehicle on the map?
Note - This feature requires additional hardware to be installed in your vehicle.
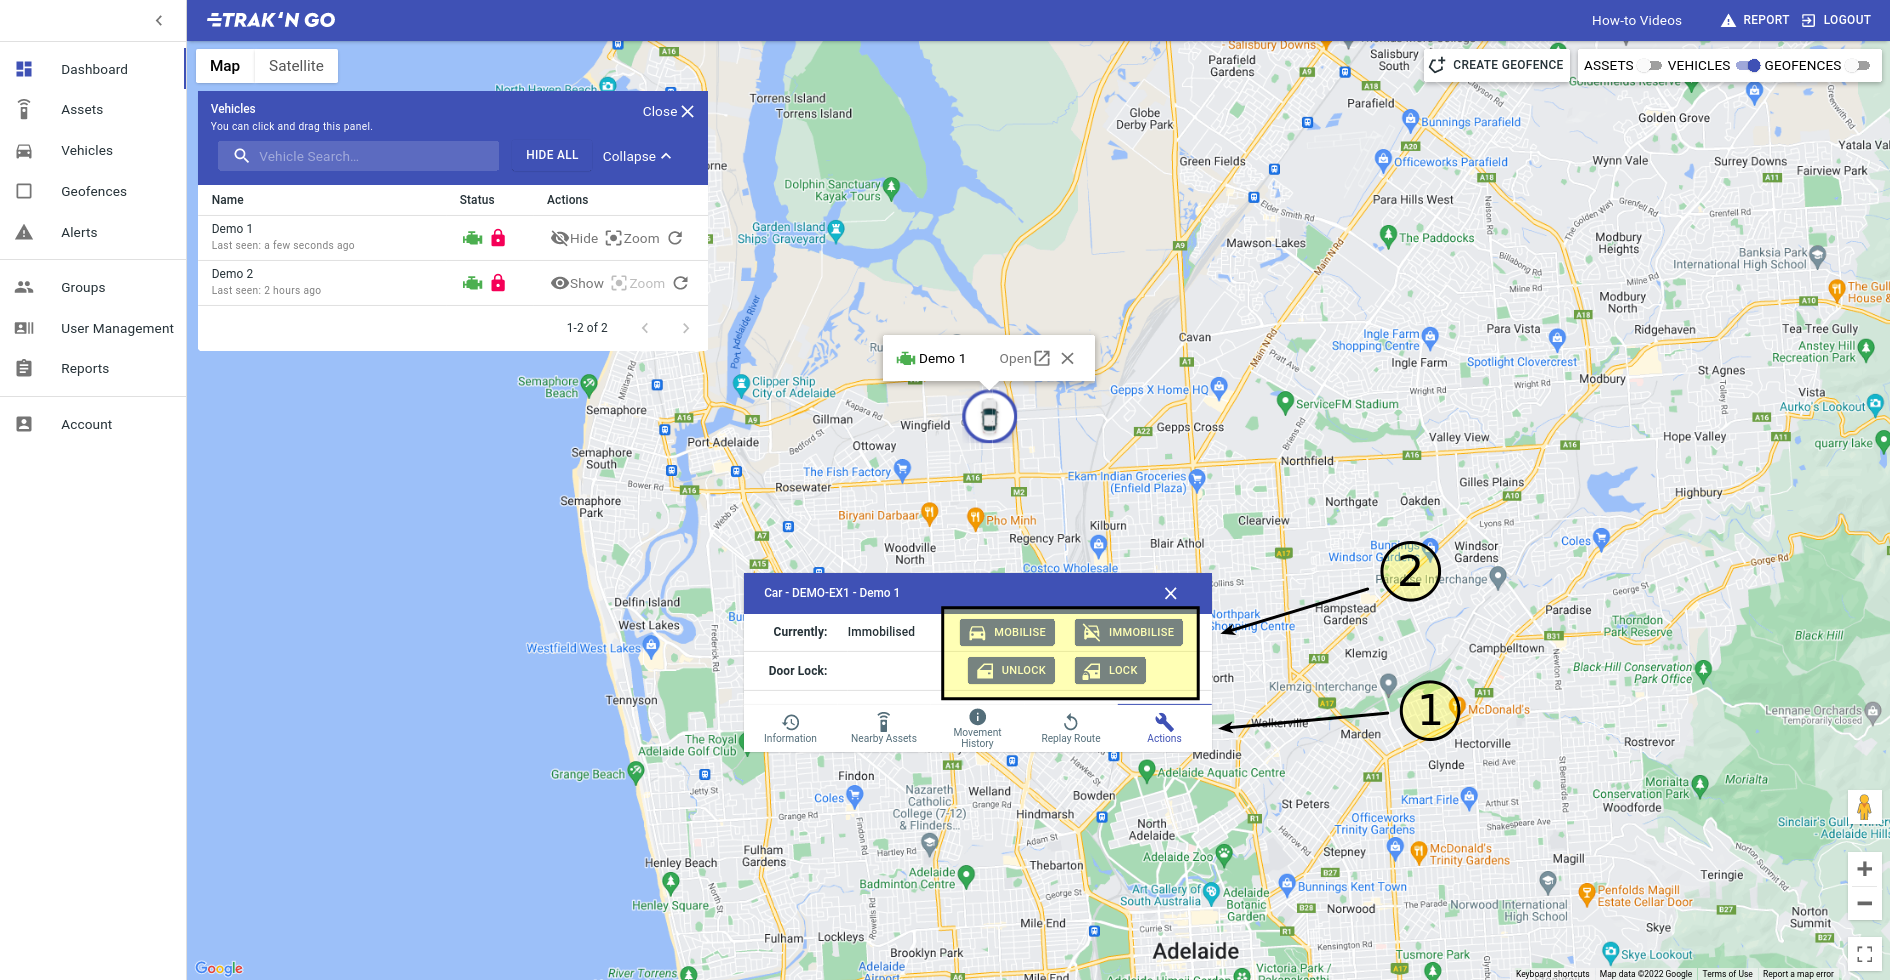
- Click on the Actions tab.
- You will see four buttons. Click on the appropriate button for what you are after.
How to see the movement history for a day?
Please follow this guide first - How to view a vehicle on the map?
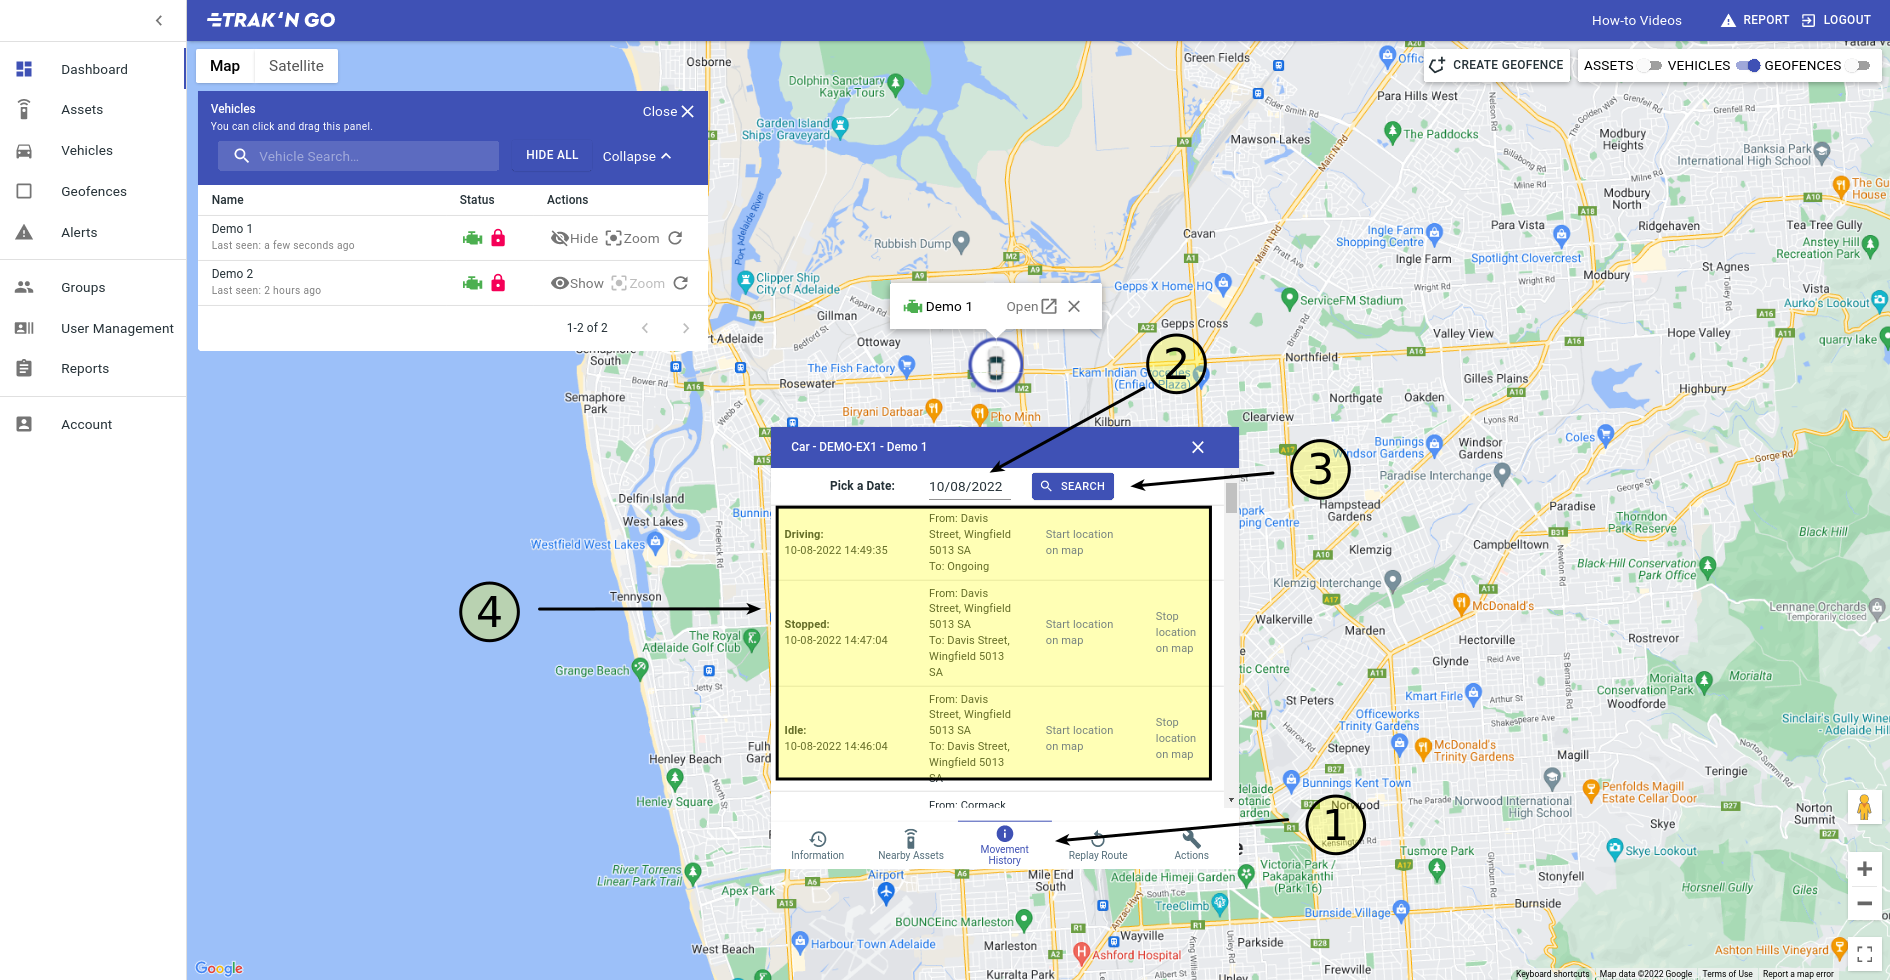
- Click the Movement History tab.
- Enter a date.
- Click Search
- It will bring up the movement history for that day.
How to create a geofence?
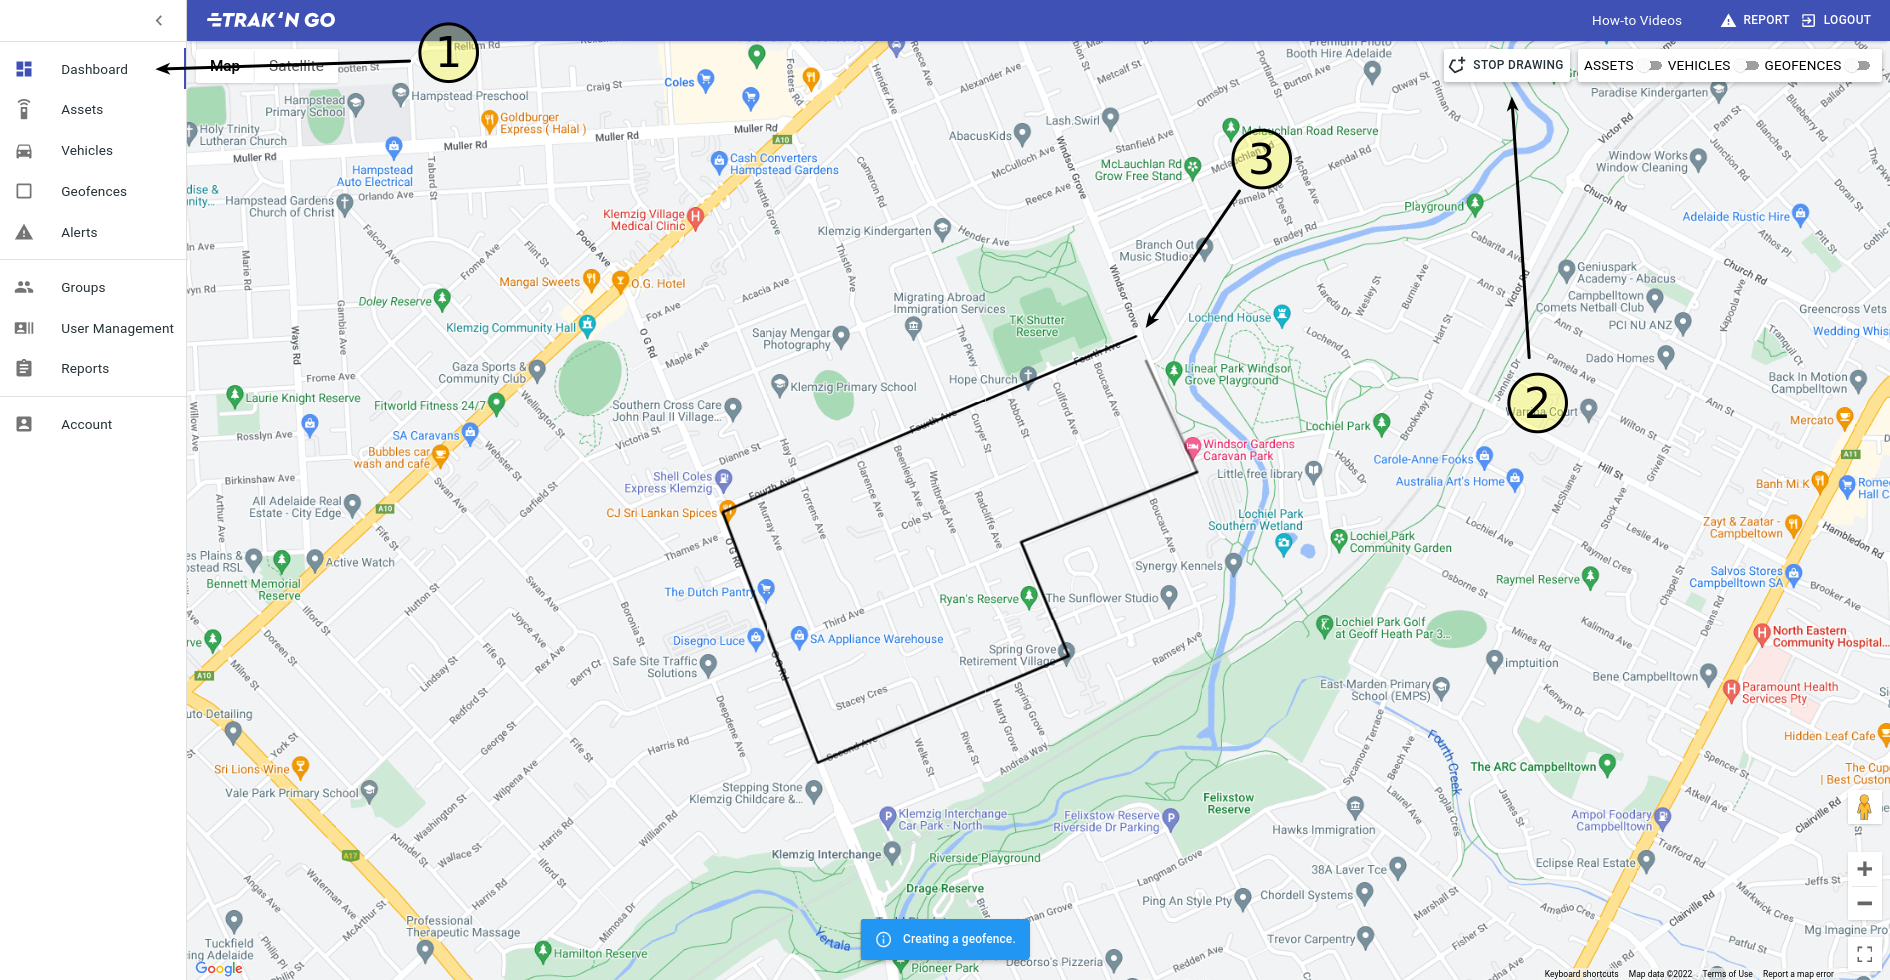
- Make sure you are on the Dashboard page.
- Click the Create Geofence Button.
- Now you can draw on the map using single mouse clicks (Don't click and drag).
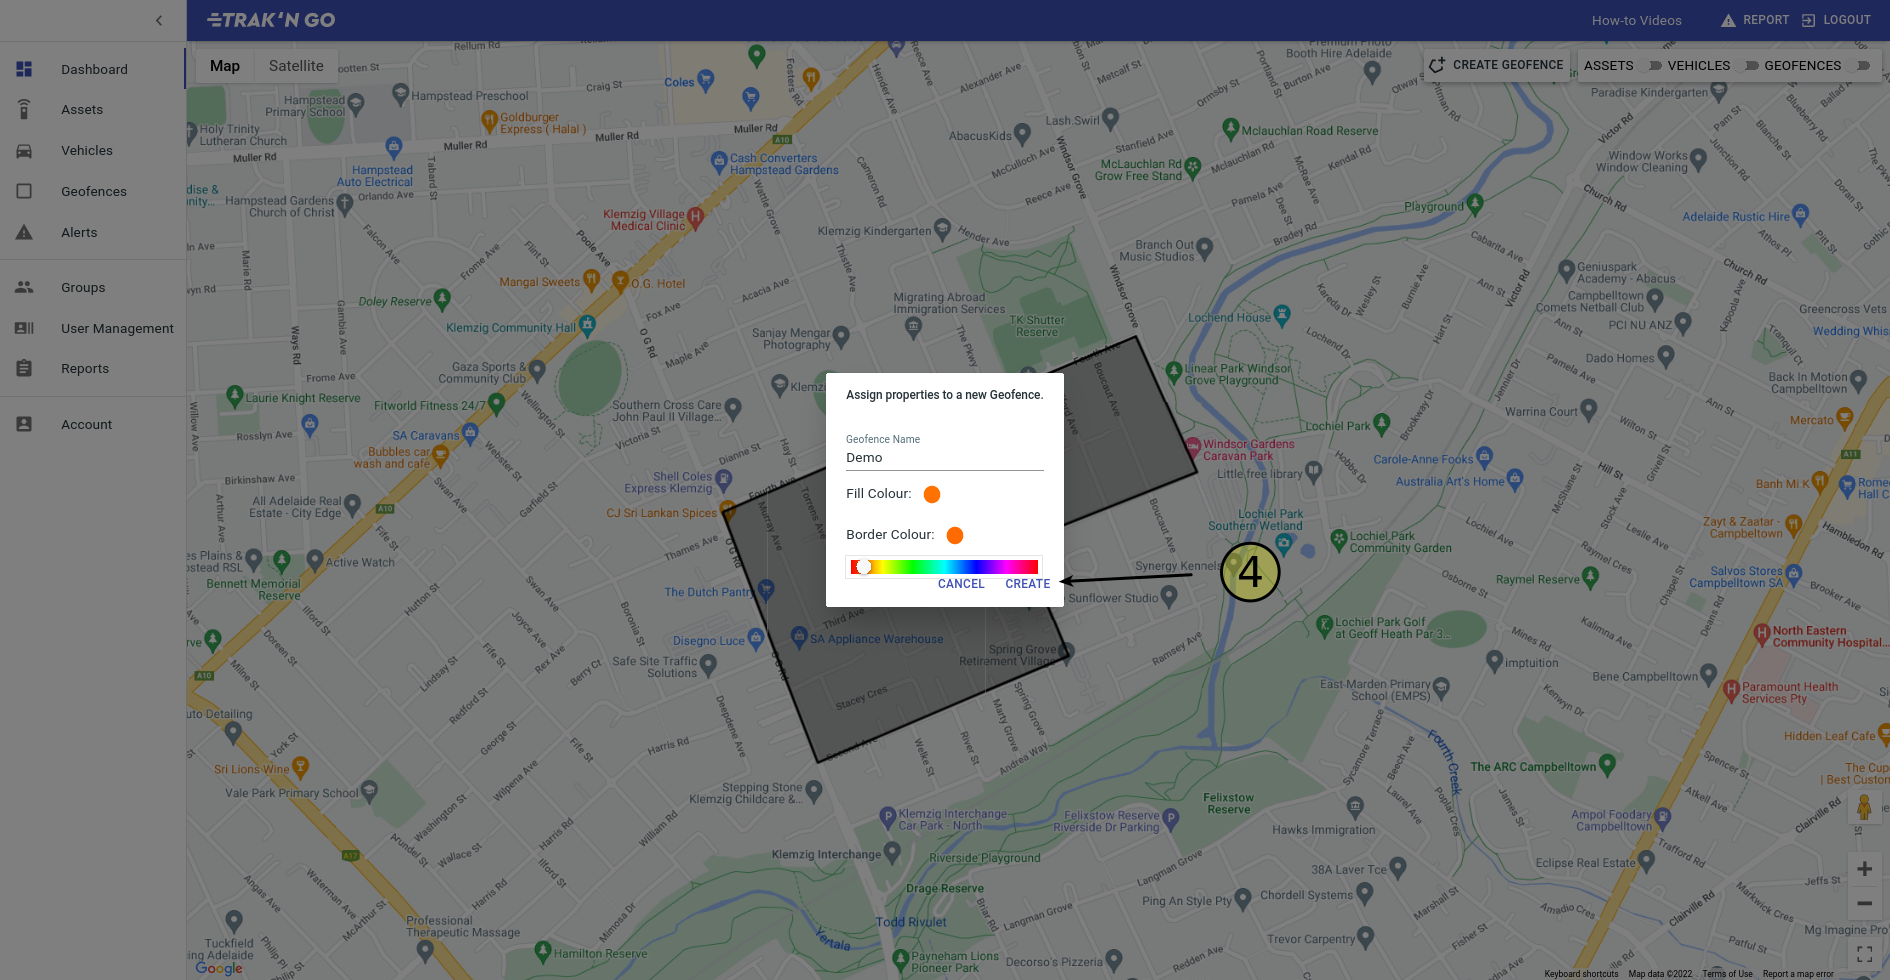
Your last click must on the same point as your starting click. This will finish your geofence. - (See below) A dialog box will pop-up asking you for your geofence's name, fill colour and border colour.
Click CREATE to finalise the geofence.
Follow this guide if you want to see the geofence you have created - How to view a geofence on the map?
How to view a geofence on the map?
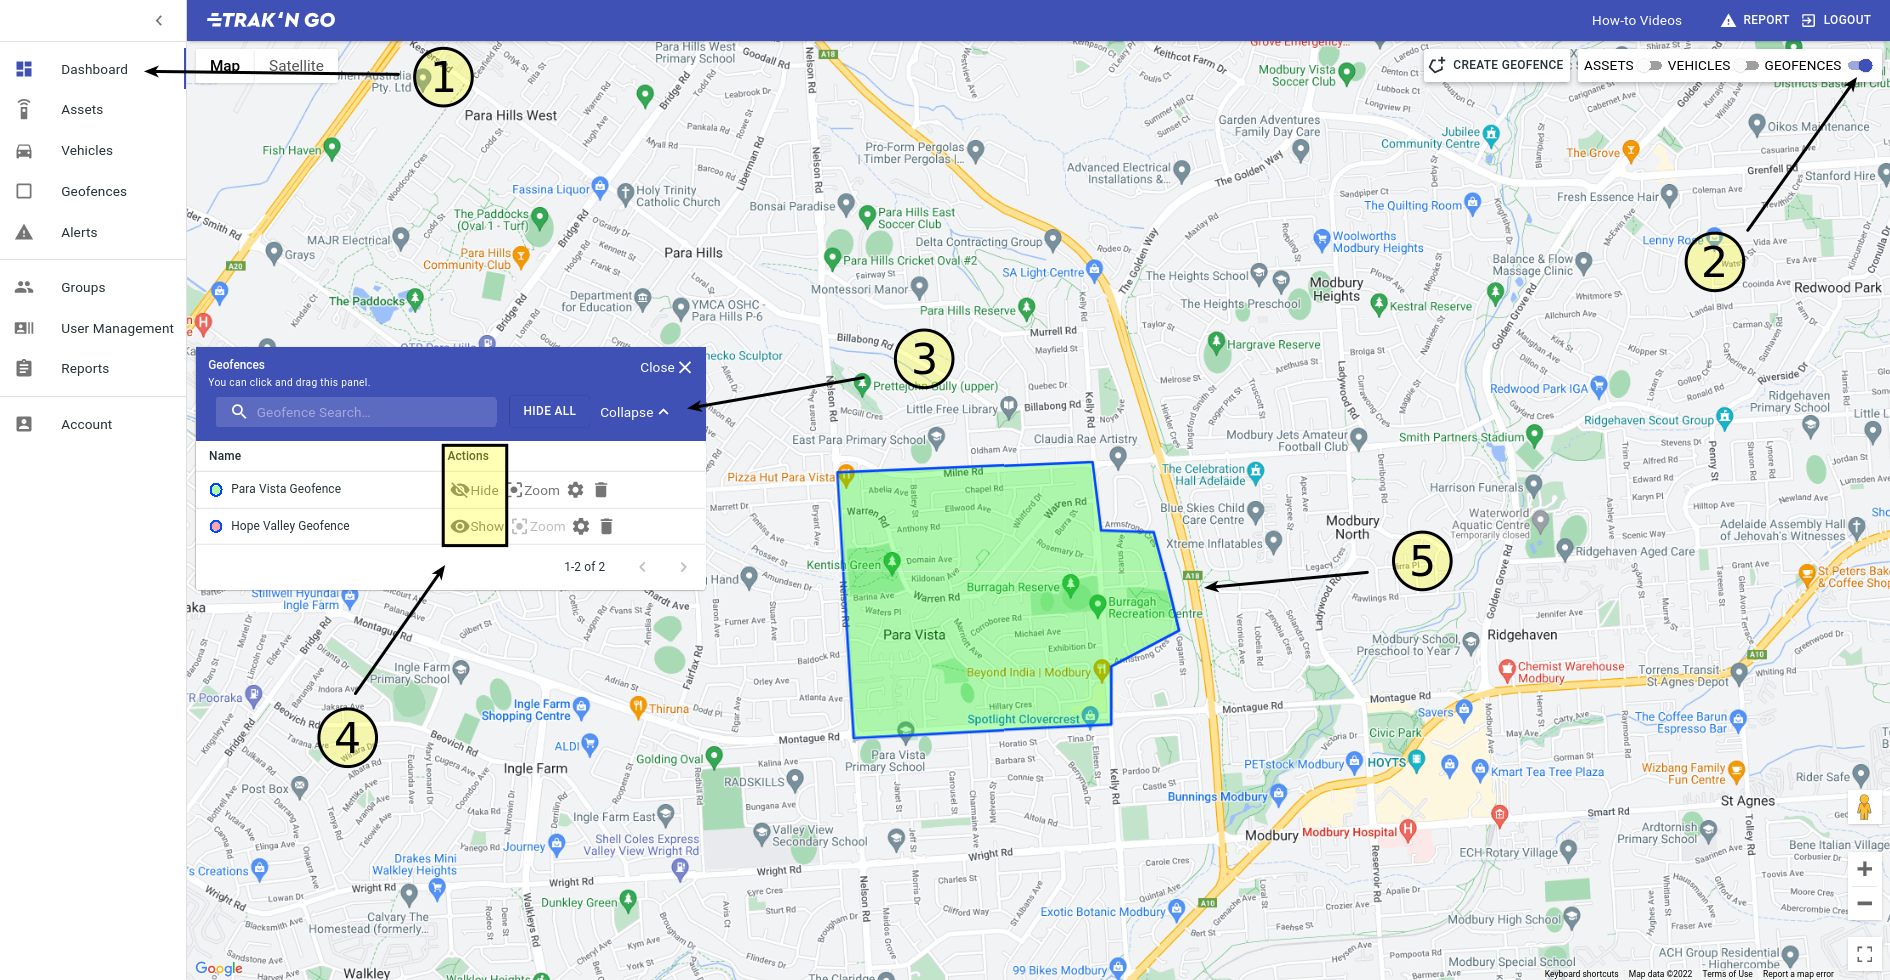
- Make sure you are on the dashboard page.
- On the top right of the screen, make sure the toggle for GEOFENCES is on.
- You will see a geofence panel, that you can open by clicking the Expand button.
- Click 'Show' Button for the geofence that you want to view on the map.
- It will appear on the map.
How to edit a geofence?
Follow this guide to view the geofence first - How to view a geofence on the map?

- Click in the middle on the geofence. This will start the editing process.
- You can click and drag on the these points to change their position.
- The points in the middle of an edge will allow you to create new points.
- Once you are done editing, click back inside the geofence to save your changes.
How to view an asset on the map?
Assets
What are assets?
Assets are things tracked via beacons as opposed to trackers. Beacons are much smaller than a tracker and require no external power. Example of items that you would want to use a beacon on are generators, ladders, toolboxes, etc.
Beacon uses Bluetooth to communicate with a tracker. A scenario where assets are best utilised is say you have multiple job sites and have vehicles that are tracked via trakngo. If an asset goes missing, you can use trakngo to look up which vehicle took that asset and to which job site.
How to edit an asset's information?
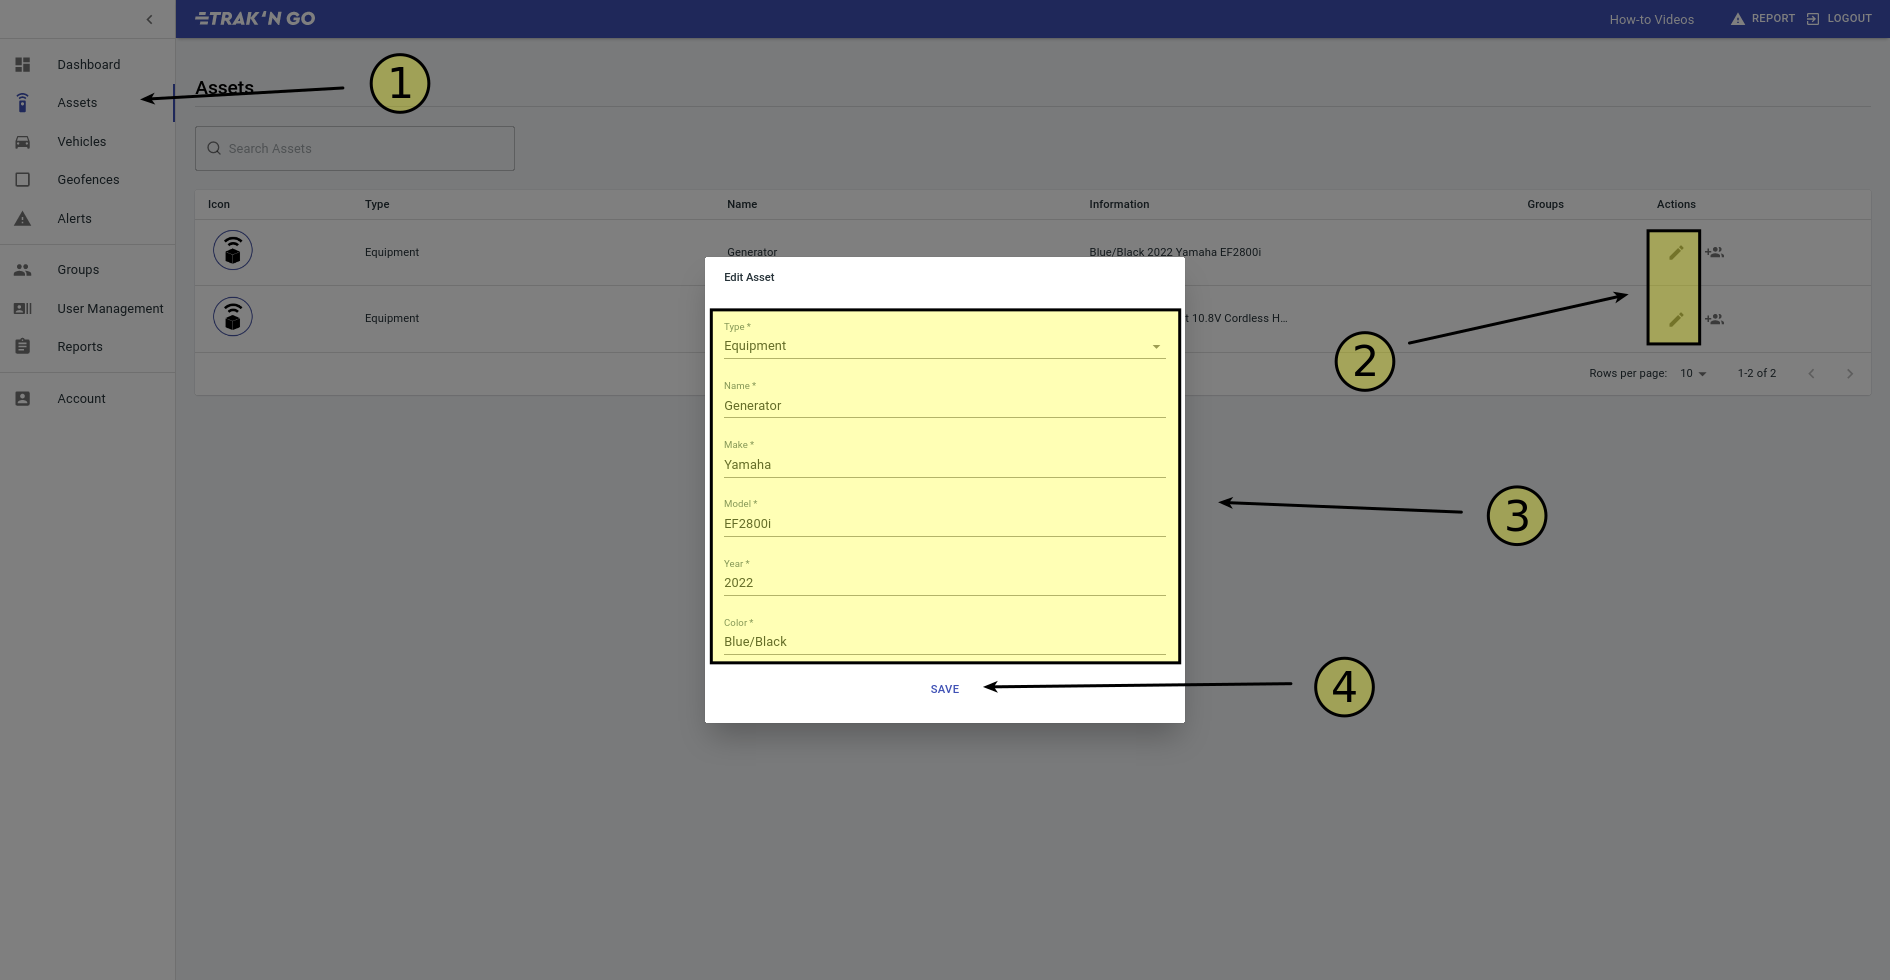
- Make sure you on the Assets page.
- Click the pencil icon on the asset you want to edit.
- Make the desired changes.
- Click SAVE to make the changes.
How to add an asset to a group?
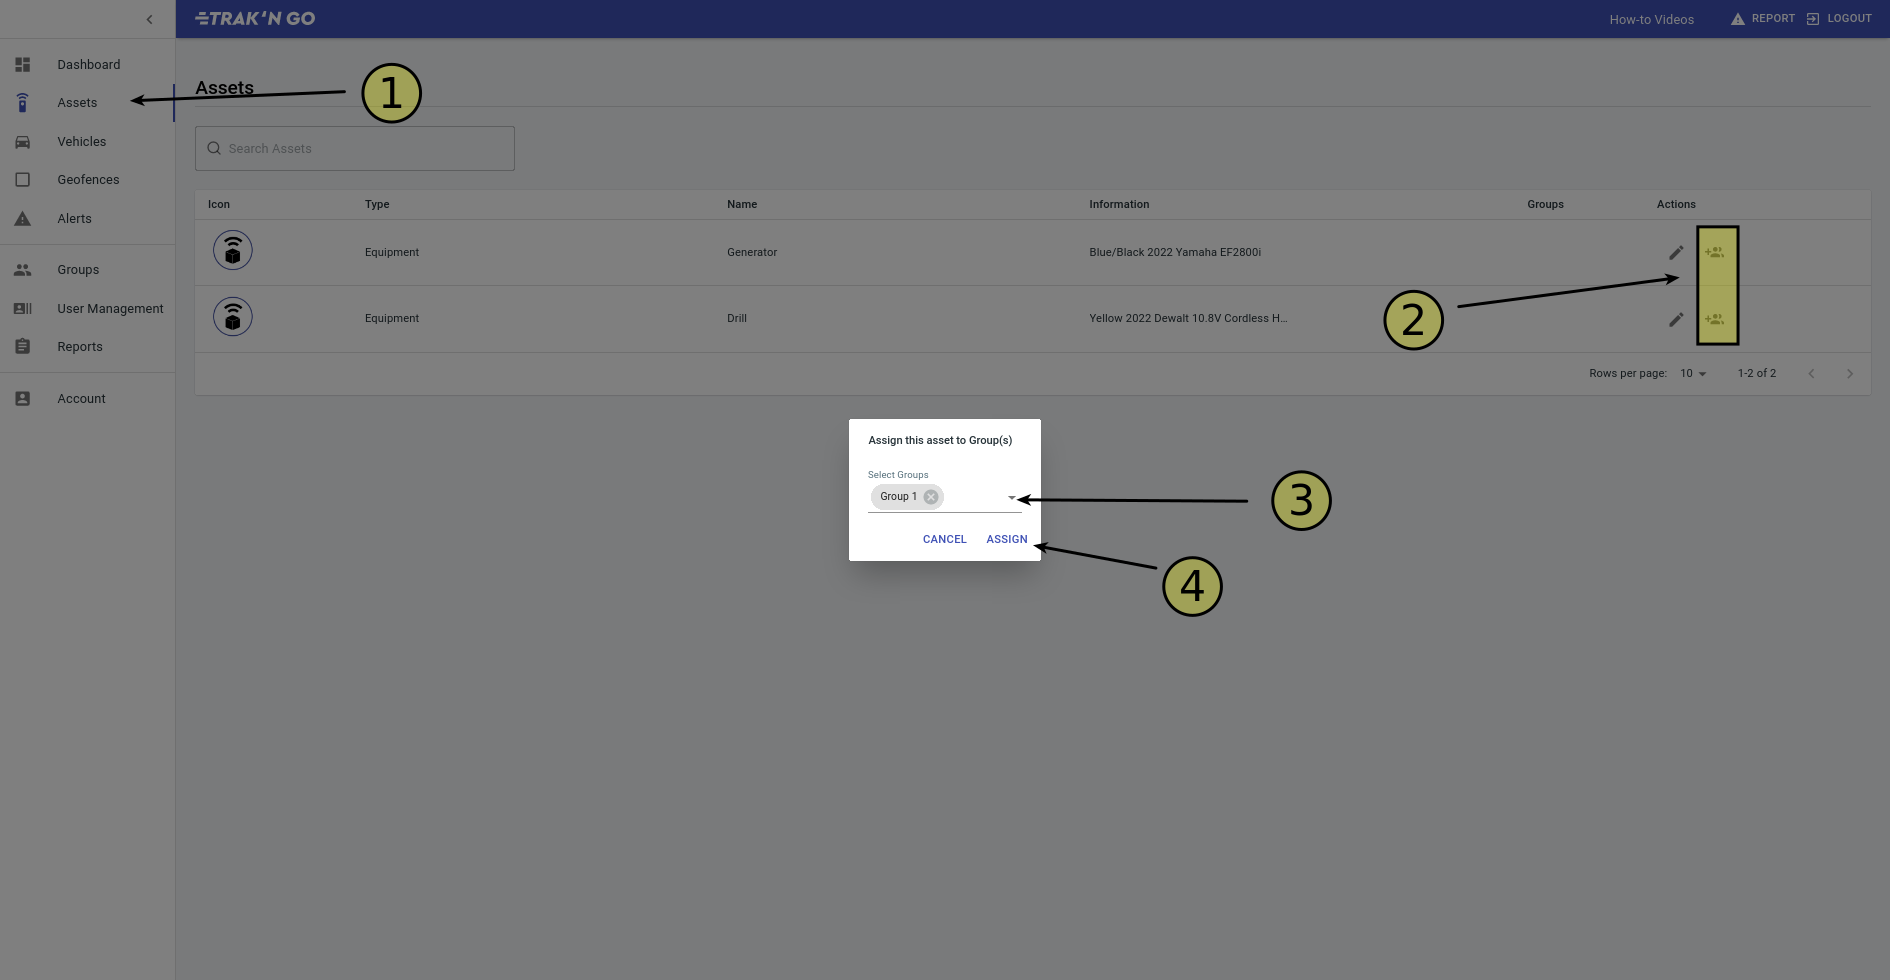
- Make sure you on the Assets page.
- Click the indicated icon for the asset you want to add to a group.
- Select the groups that you want to add the asset to.
- Click ASSIGN to make the changes.
Vehicles
How to edit a vehicle's information?
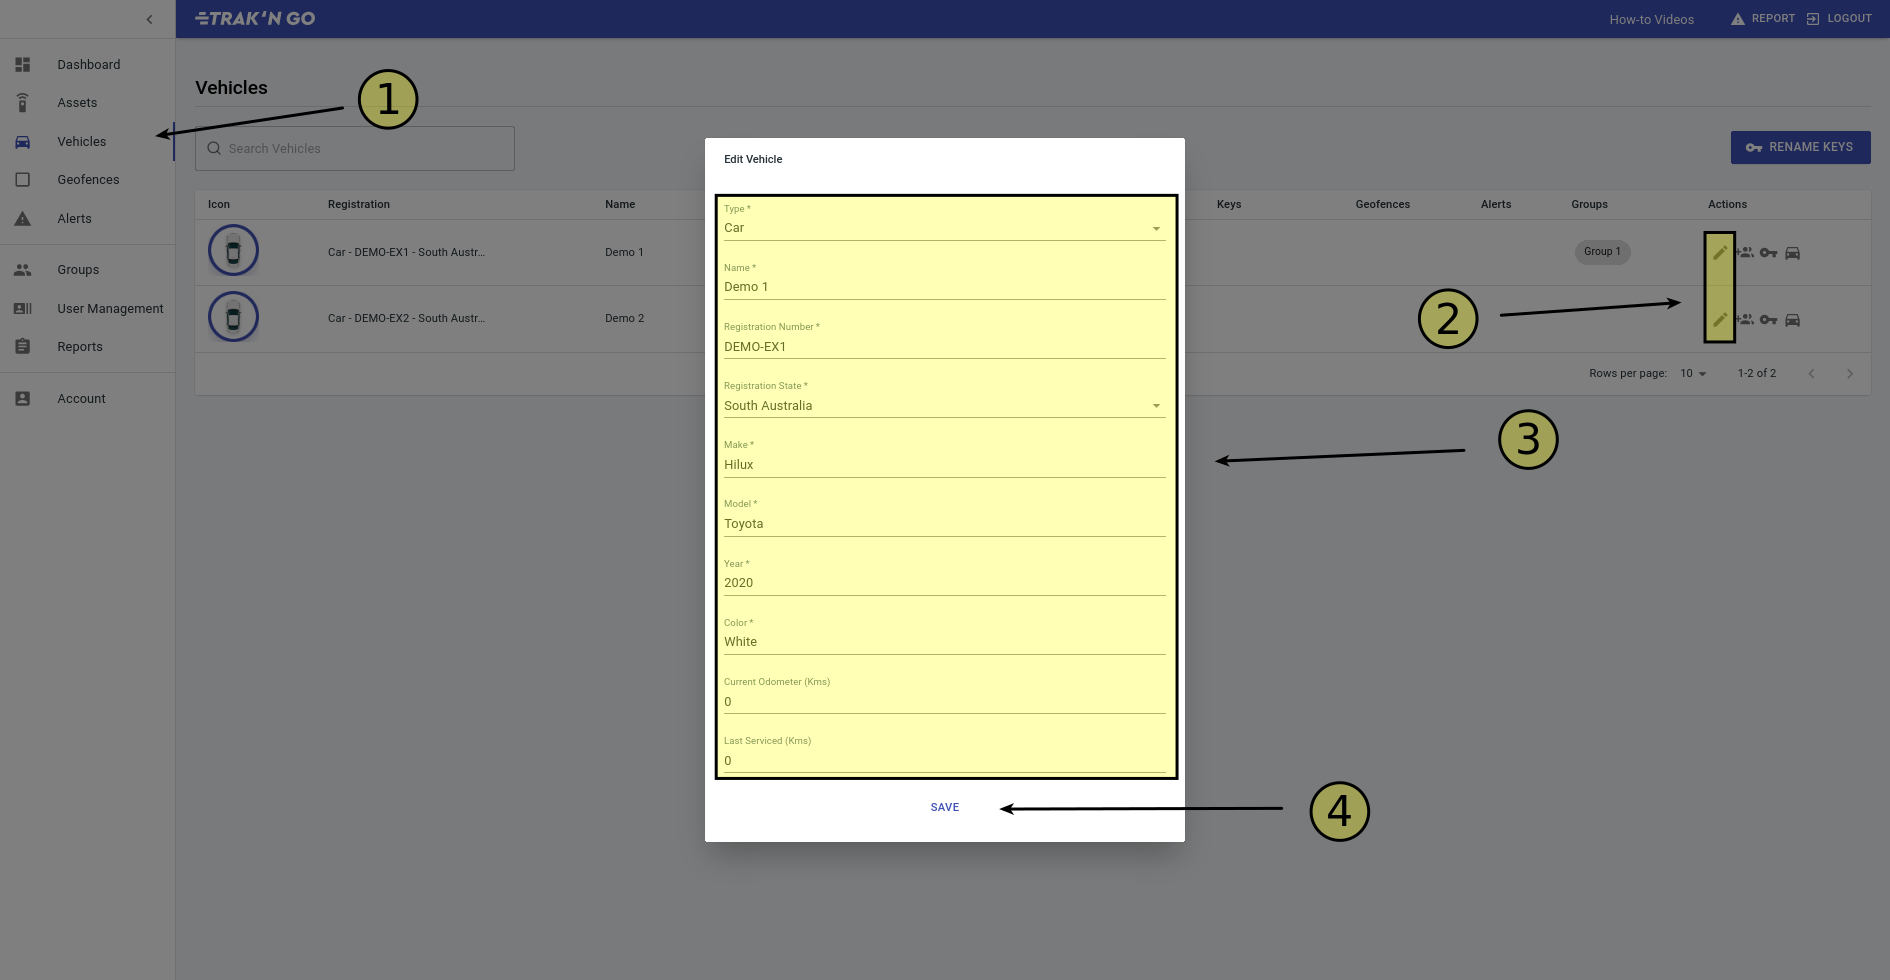
- Make sure you are on Vehicles page.
- Click the pencil button on the vehicle that you want to edit.
- Make the desired changes.
- Click SAVE to make the changes.
How to add a vehilce to a group?
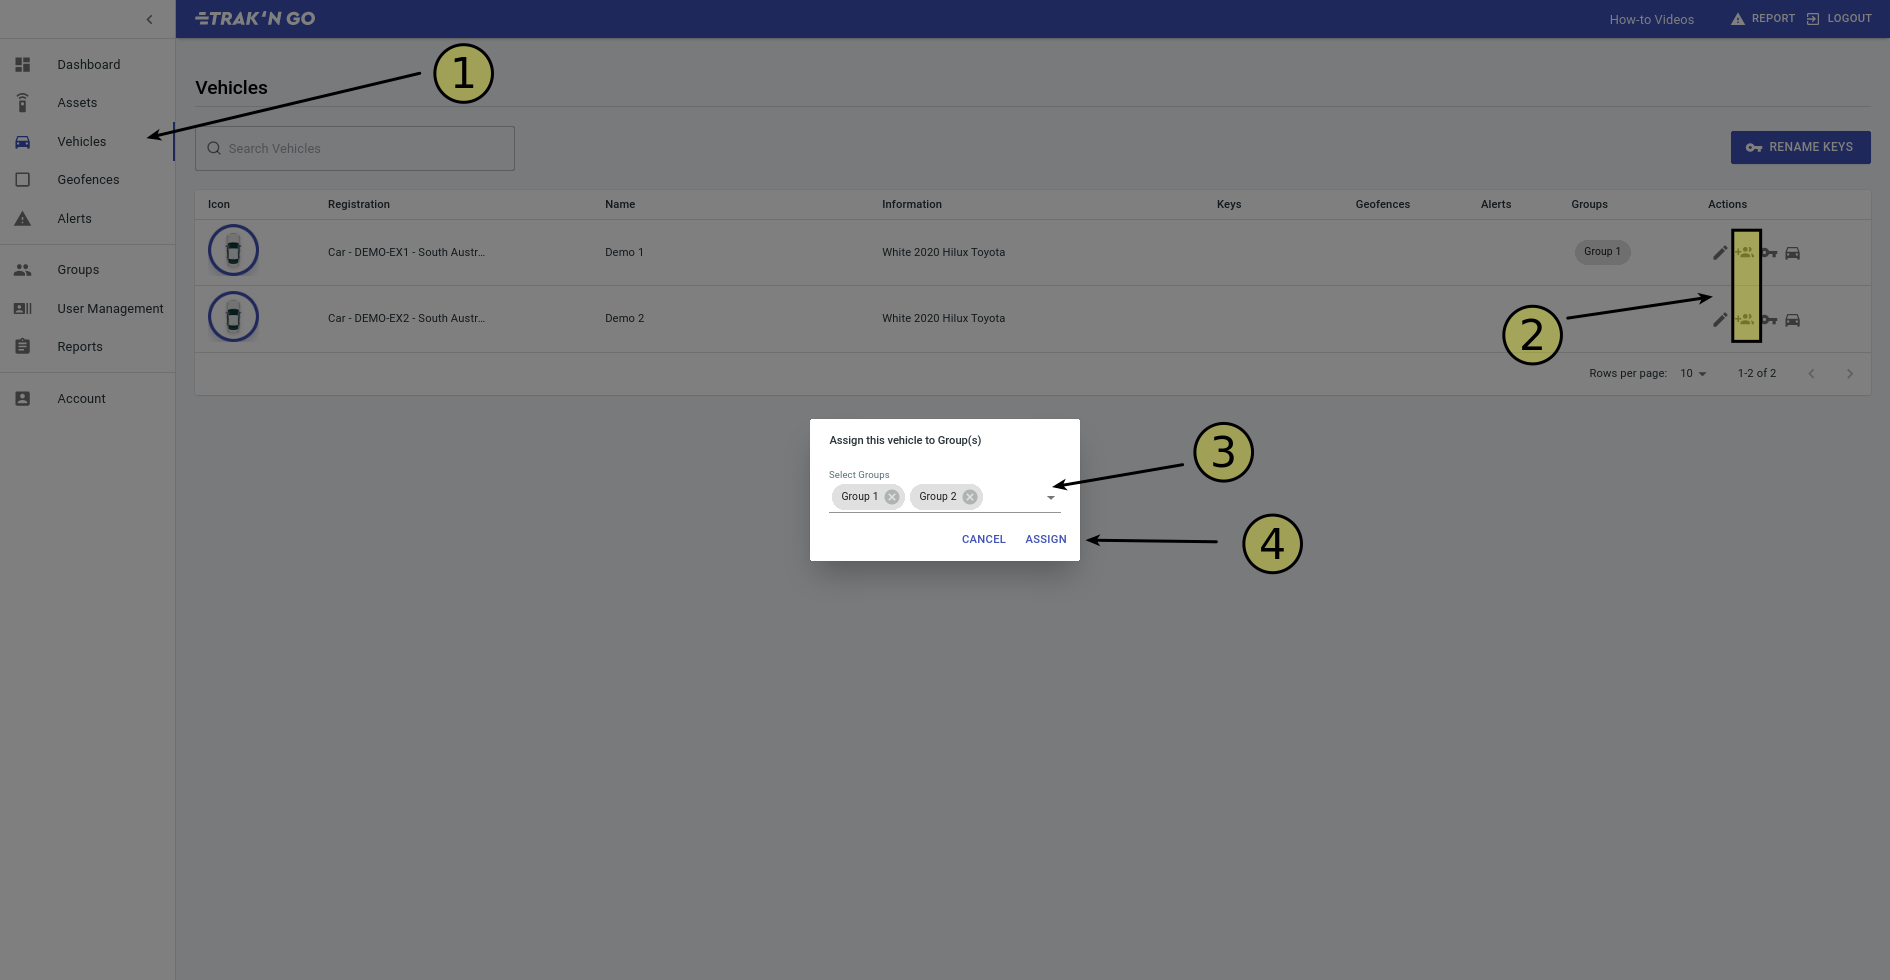
- Make sure you are on the vehicles page.
- Click on the indicated button for the vehicle that you want to add to a group.
- Select the groups that you want the vehicle to appear in.
- Click ASSIGN to make the changes.
What is Driver Authentication?
How to assign a key to a vehicle?
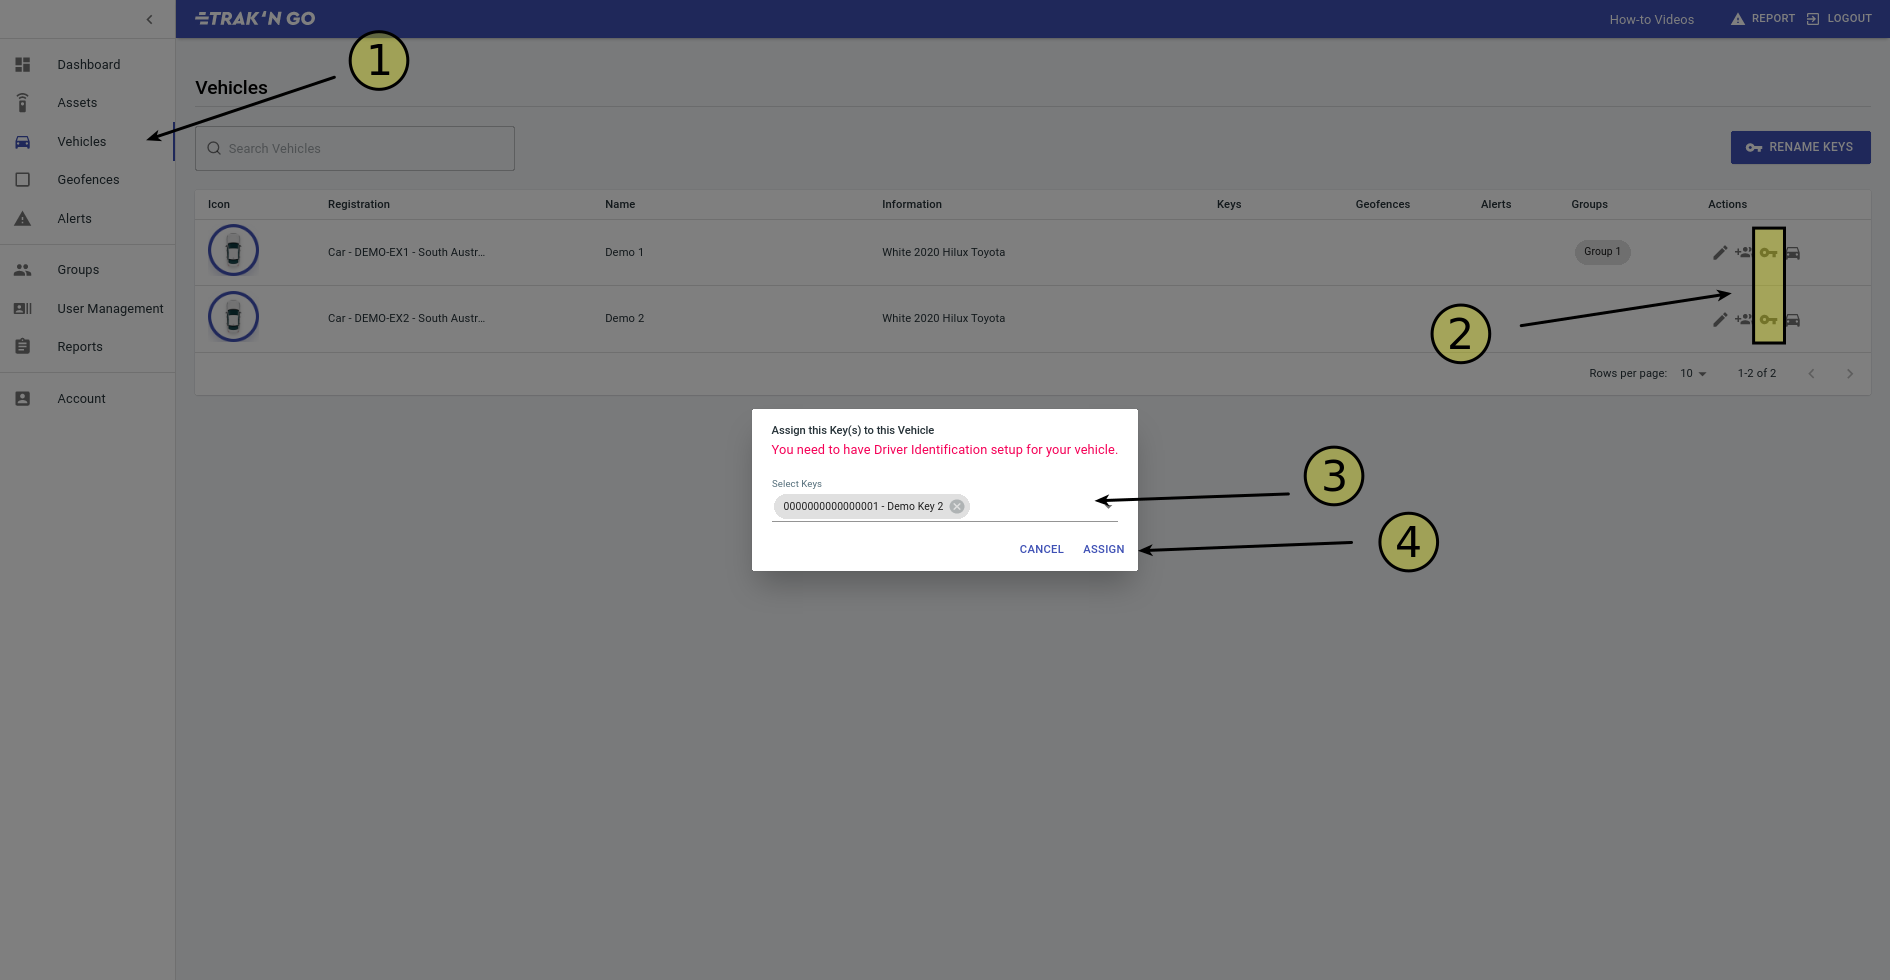
- Make sure you are on the vehicles page.
- Click the key icon for the vehicle that you want.
- Select the keys that you want to assign to the vehicle.
- Click ASSIGN to make the changes.
How to immobilise a vehicle from the vehicles page?
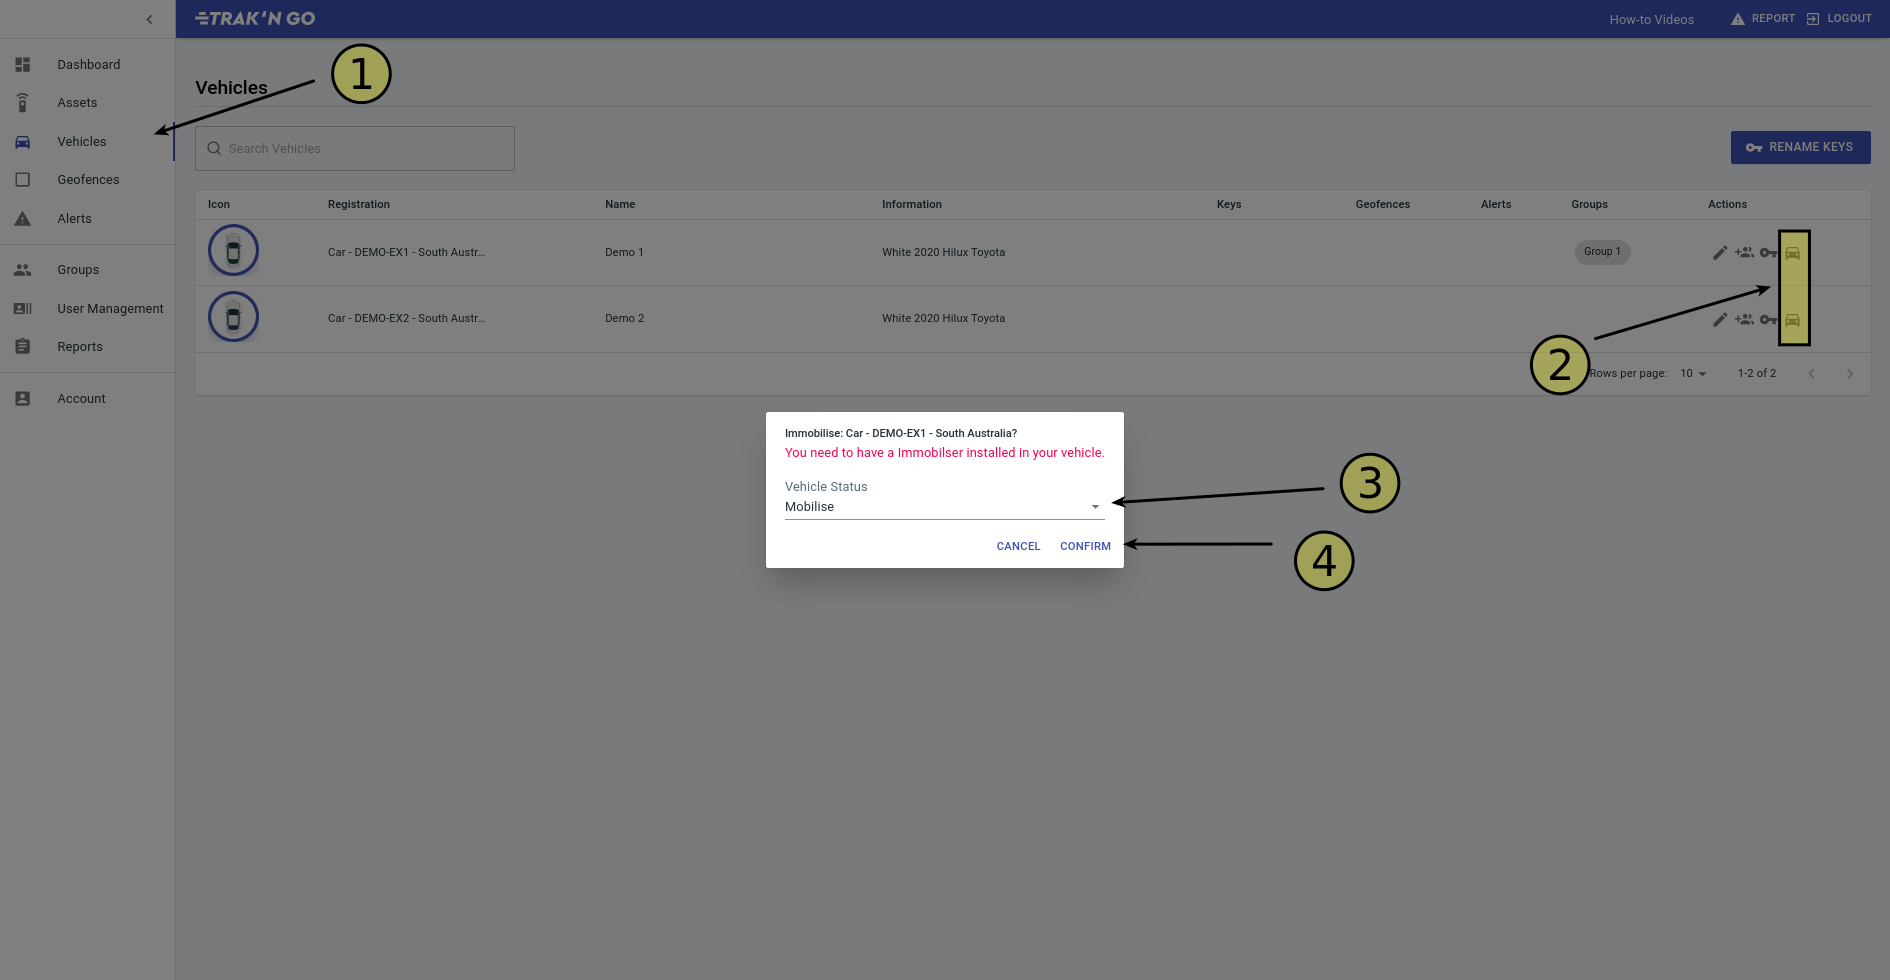
- Make sure you are on the Vehicles page.
- Click the car icon for the vehicle that you want to immmobilise/mobilise.
- Select from immobilise or mobilise.
- Click CONFIRM to send the command to the tracker.
Geofences
What are geofences?
With Geofences, you can setup a virtual perimeter on a map and assign vehicles to the geofence.
Anytime a vehicle enters or exits the geofence, you will be notified.
How to assign vehicles to a geofence?
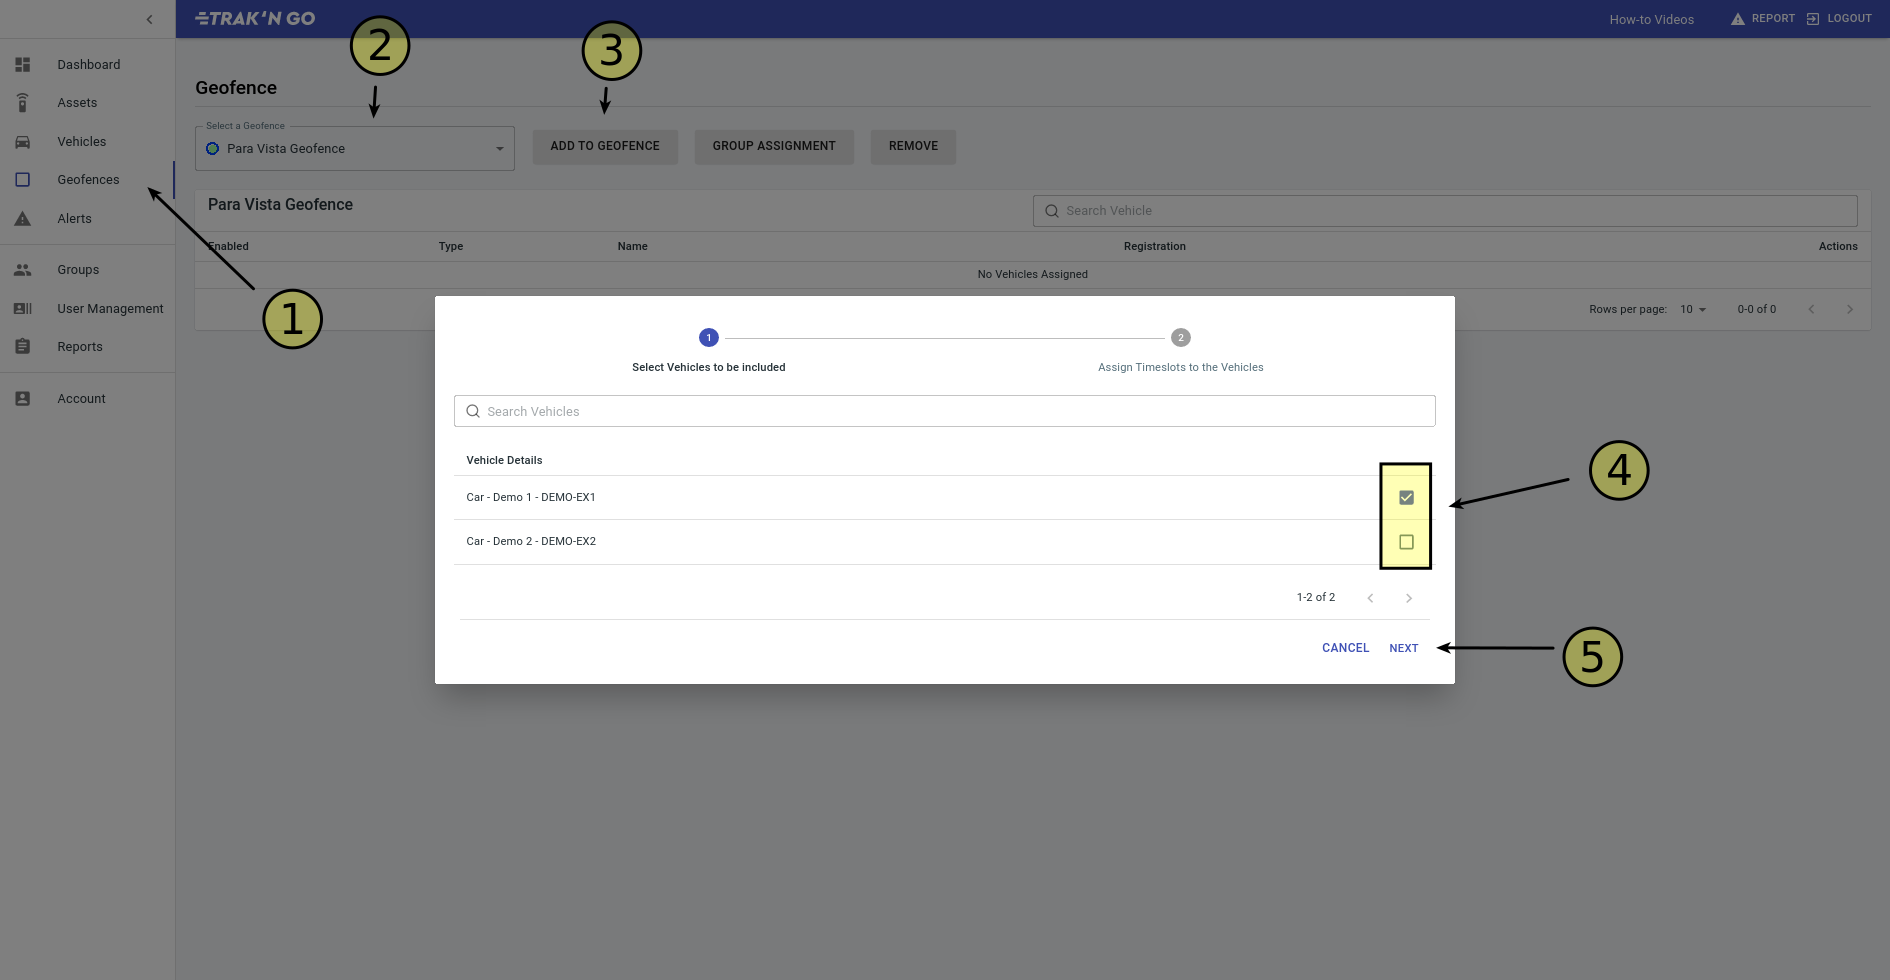
- Make sure you are on the Geofence page.
- Select a geofence from the drop down list to open it.
- Click ADD TO GEOFENCE button. This will bring up the dialog box.
- Check the vehicles that you want to assign to this geofence.
- Click NEXT to move onto the next page.
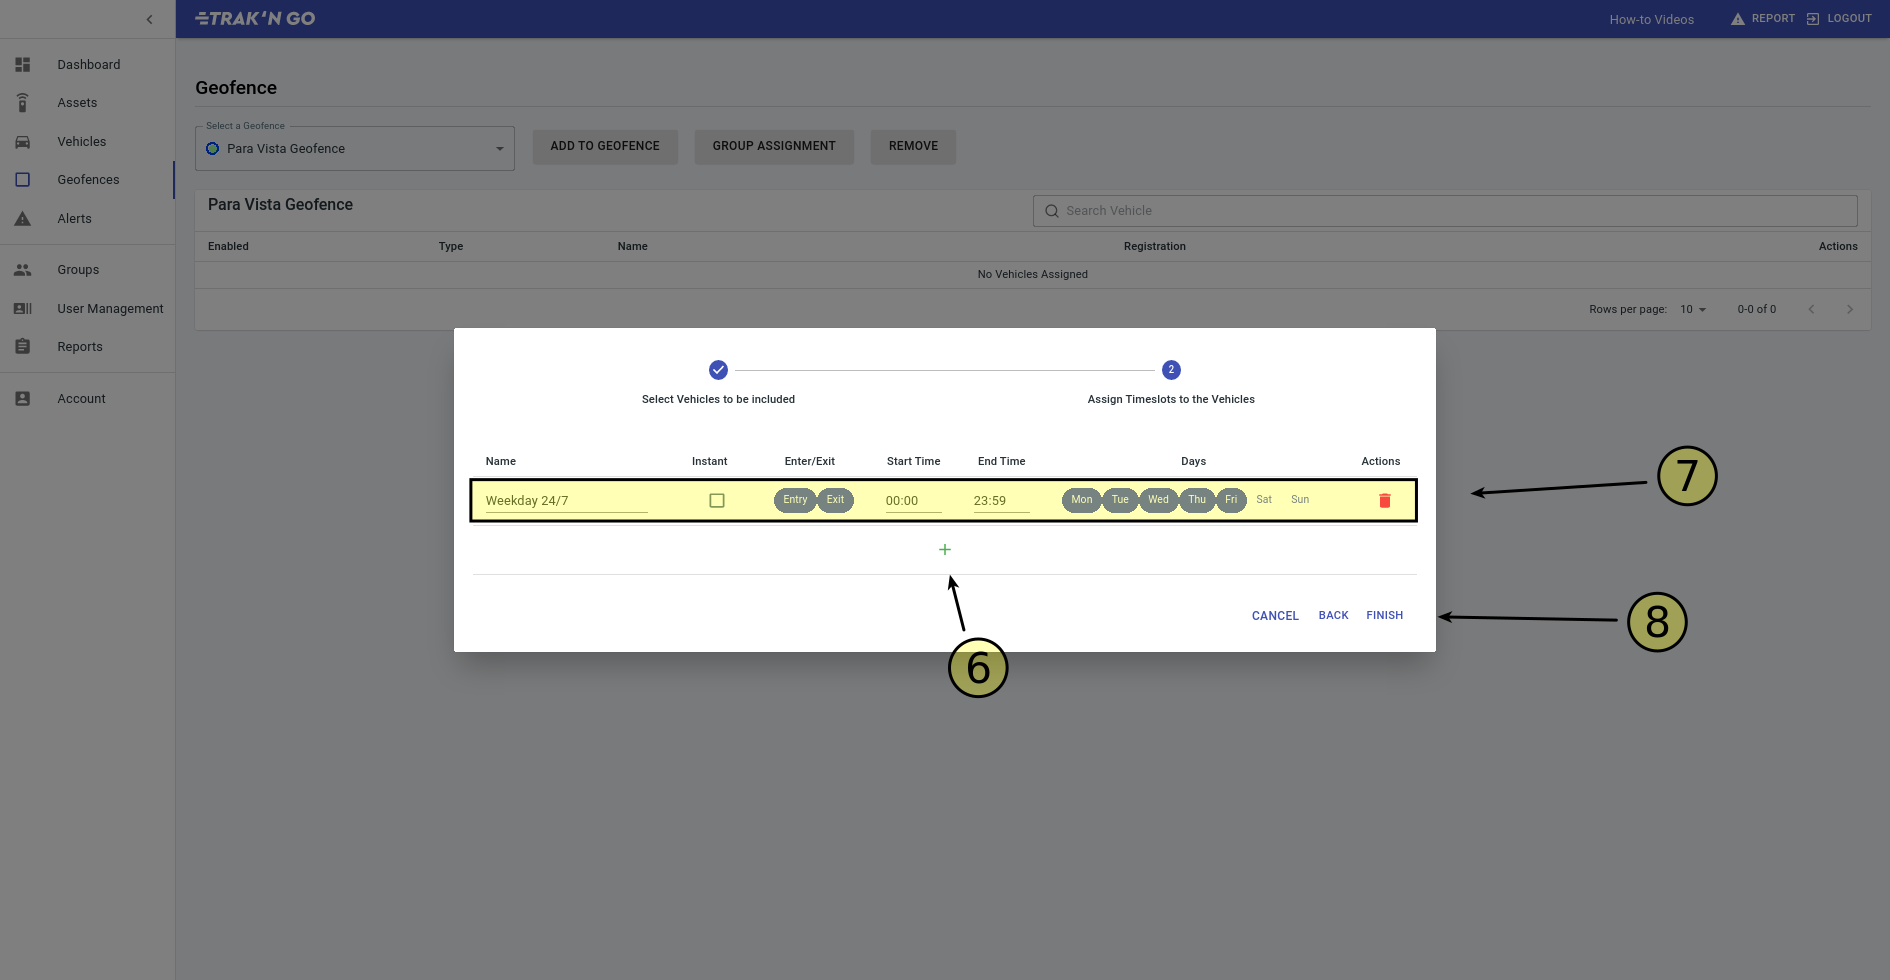
- Click the + button to add a timeslot.
- Configure the timeslot. From left to right you can:
Name the timeslot, Select whether to notify you instantly or in a daily email, on entry or on exit, the start and end time for each day, days of the week and finally you click the red bin to remove the timeslot. - Click FINISH to save the changes.
How to delete a geofence?
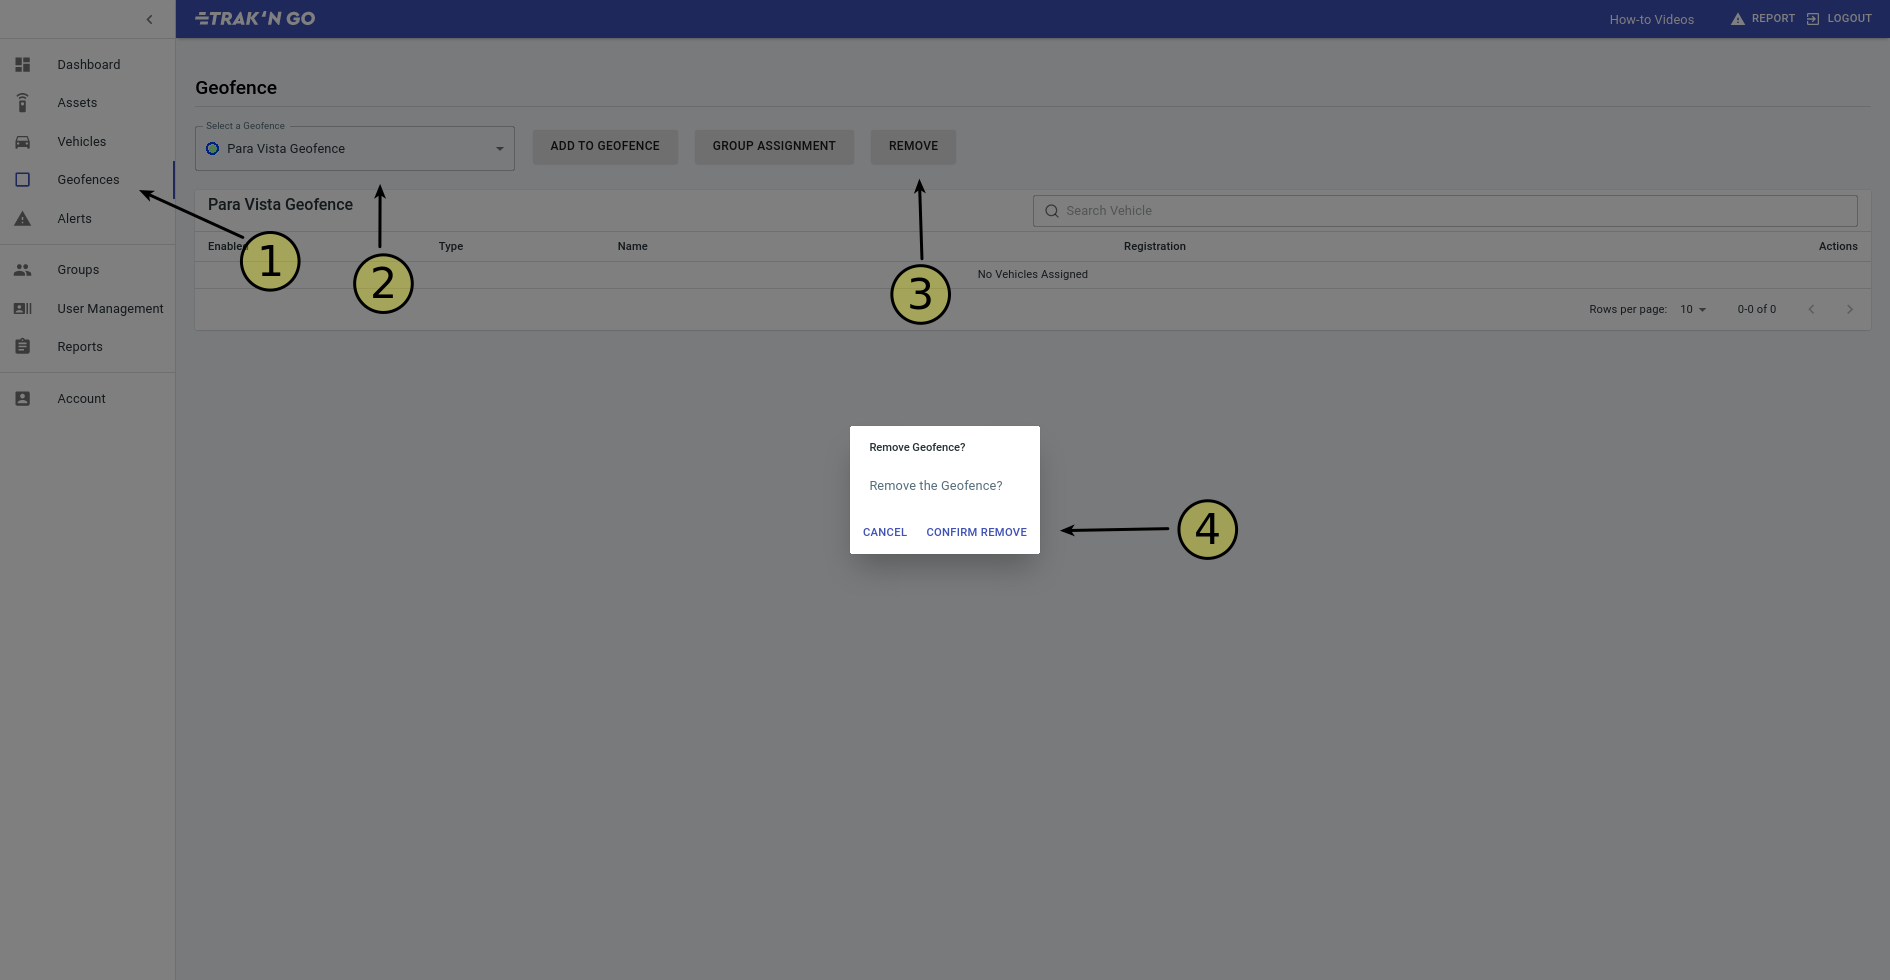
- Make sure you are on the Geofences page.
- Select a geofences from the drop down to open it.
- Click REMOVE button.
- Click CONFIRM REMOVE to delete the geofence.
How to add a geofence to a group?
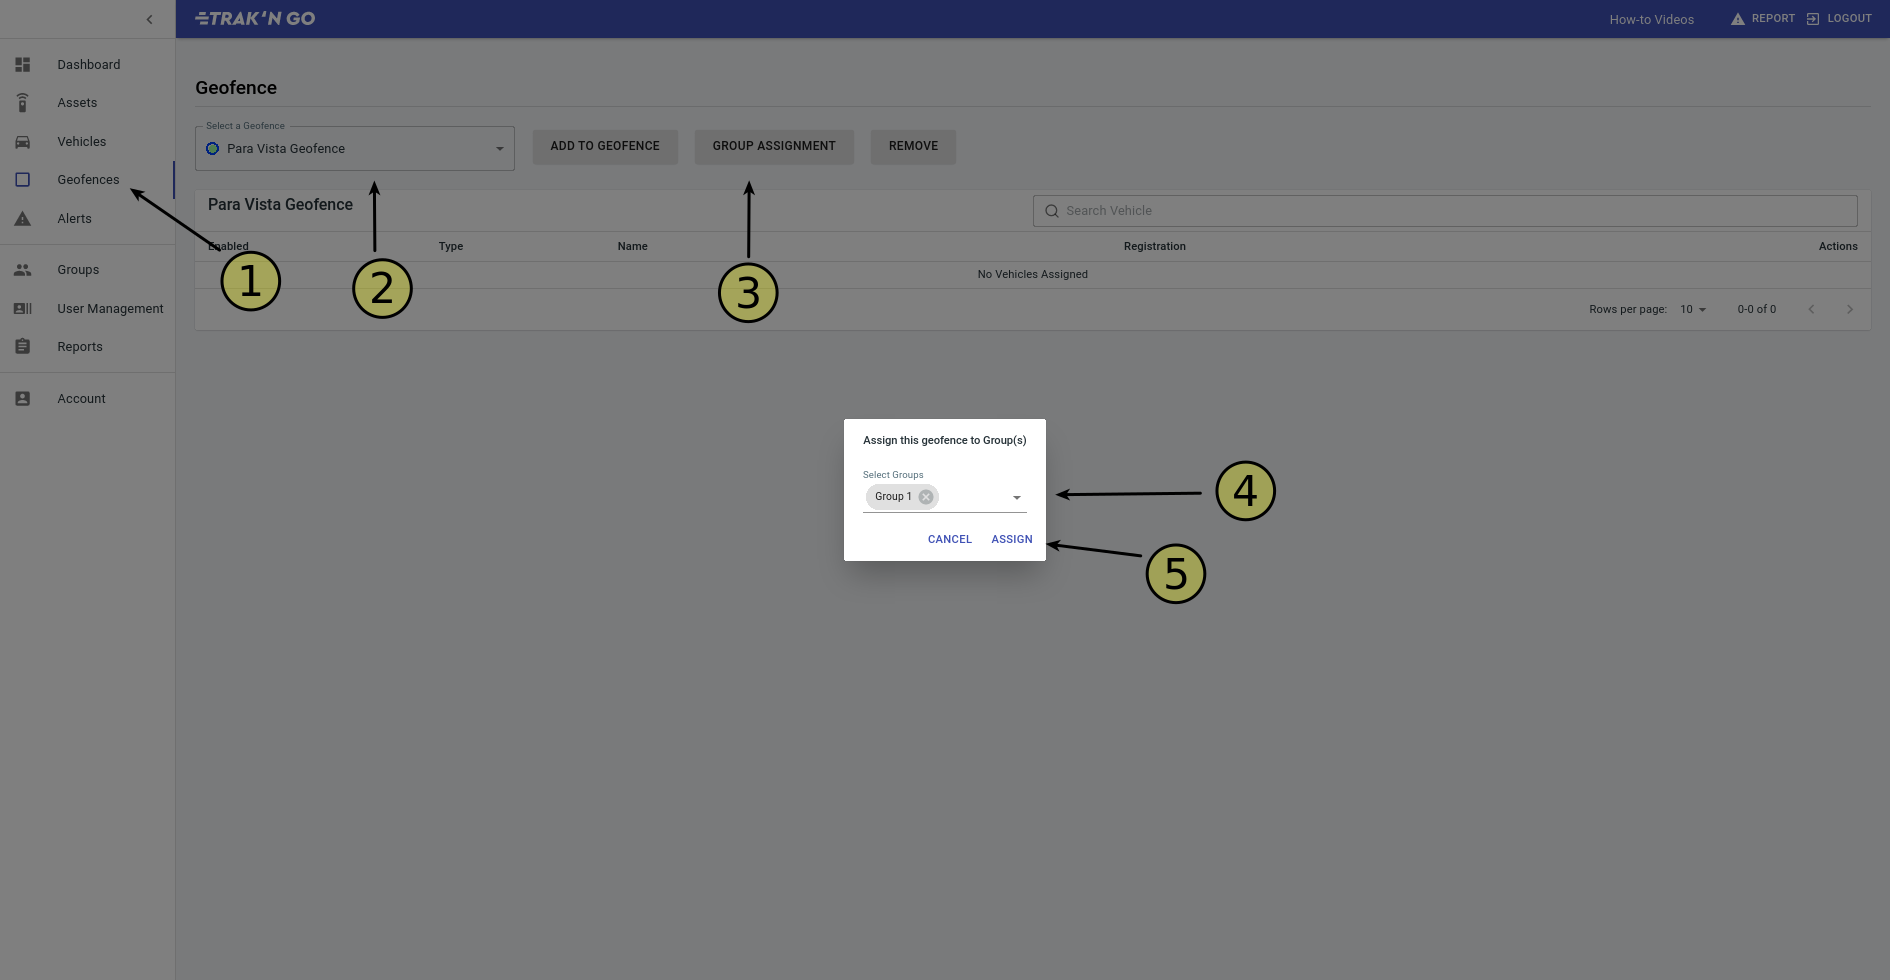
- Make sure you are on the Geofences page.
- Select a geofence from the drop down to open it.
- Click GROUP ASSIGNMENT button.
- Select the groups that you want the geofence to be in.
- Click ASSIGN to save the changes.
How to change notification time for a vehicle inside a geofence?
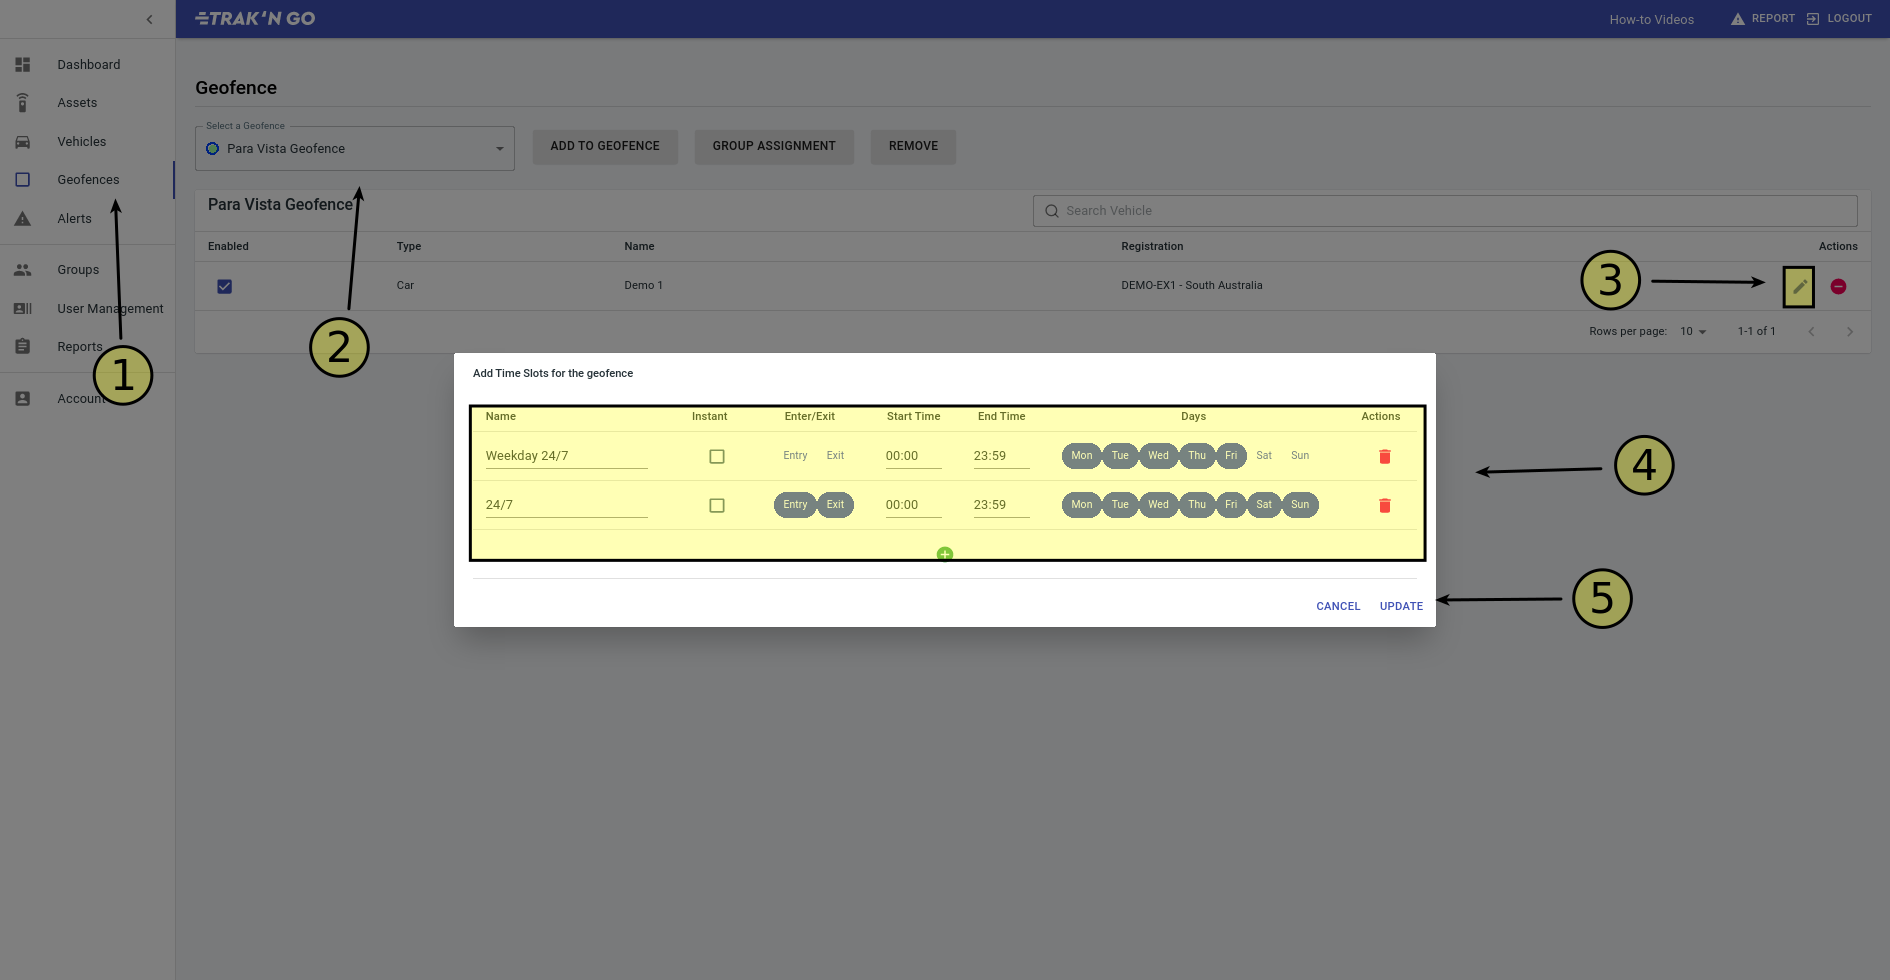
- Make sure you are on the Geofences page.
- Select a geofence from the drop down to open it.
- Click the pencil icon for the vehicle that you want make changes to.
- Make the desired changes.
- Click Update to save the changes.
Alerts
What are alerts?
There are seven alerts in Trakngo.
Speed alert: This will alert you if a vehicle goes above a set speed.
Service alert: This will alert you if a vehicle needs to be serviced.
Temperature alert*: This will alert you if the temperature of a vehicle between goes outside of a set range. Note: this requires a temperature probe to be installed in your vehicle.
Tamper alert*: This will alert you if the tracker was unplugged from your vehicle.
Stolen alert: This will alert you of any activity on a vehicle. It cannot tell you whether you vehicle is being stolen. Only assign vehicles that you know to be stolen.
Towing alert: This will alert you if a vehicle is being towed.
Offline alert: This will alert you if a vehicle was offline for more than a set number of hours.
* : Appropriate tracker and/or accessory required.
How to create a alert?

- Make sure you are on the Alerts page.
- Click NEW ALERT button.
- Fill in the details.
- Click CREATE to finish creating the alert.
How to assign vehicles to an alert?
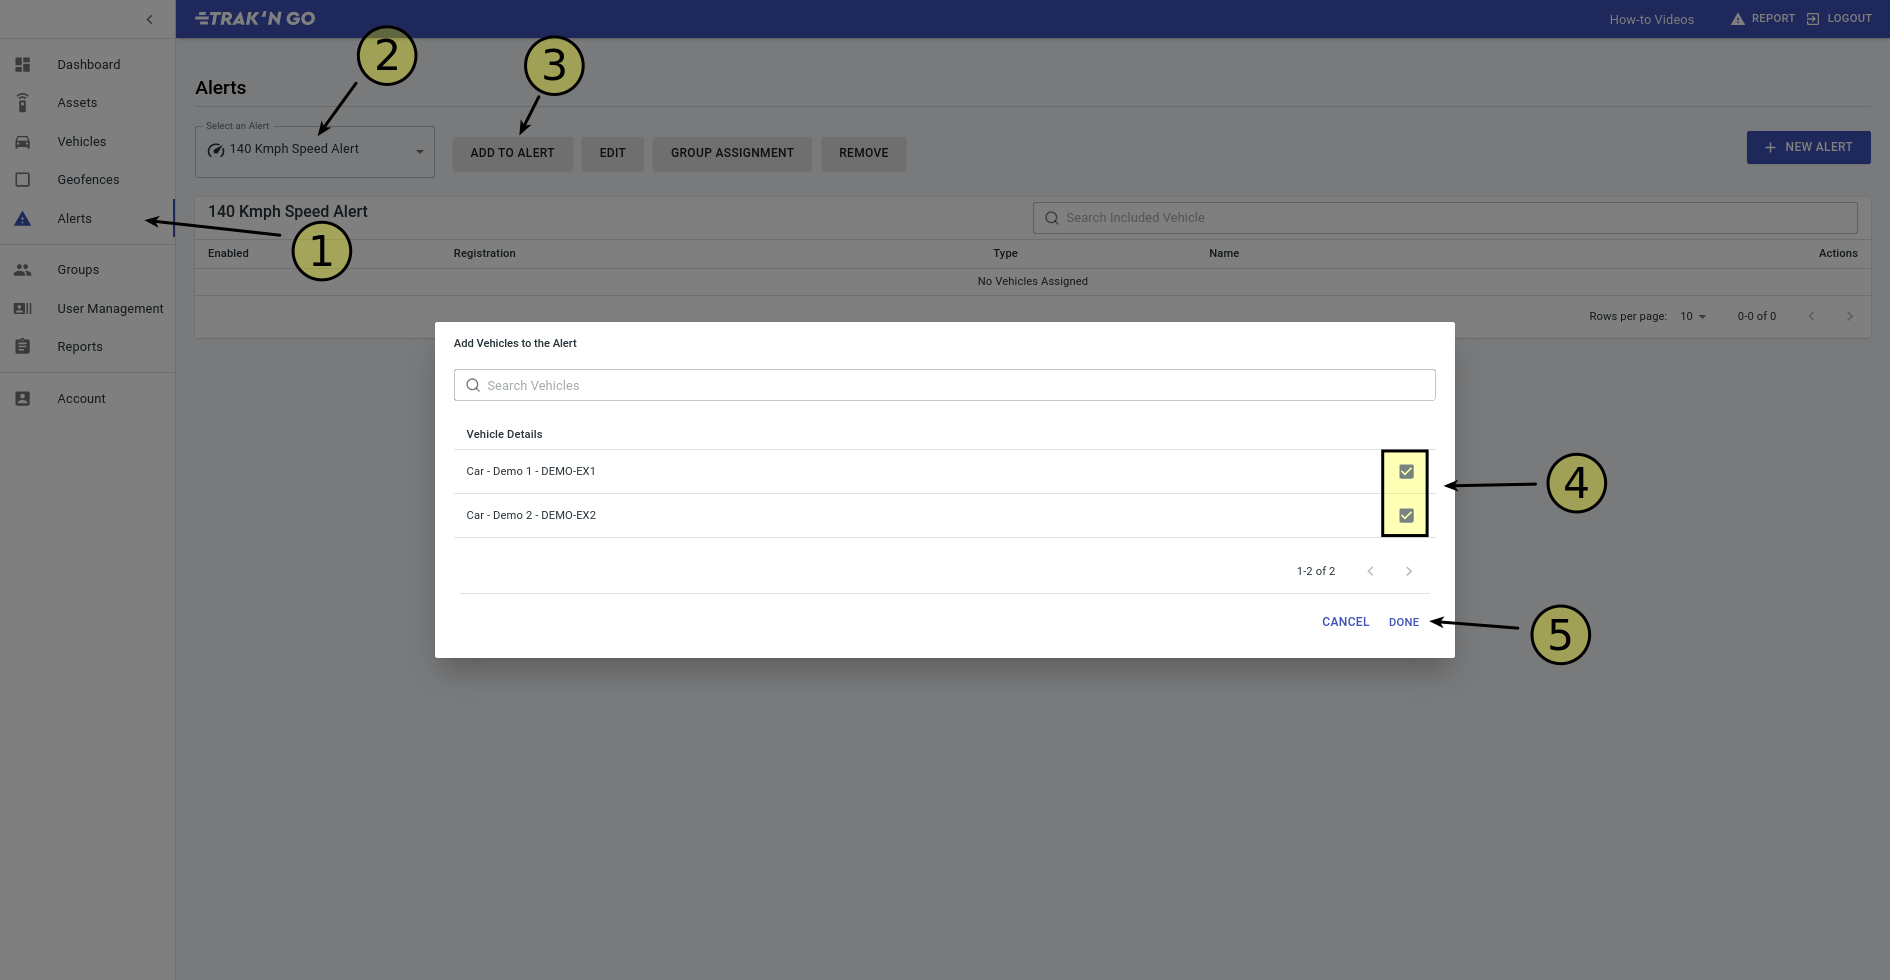
- Make sure you are on the Alerts page.
- Select an alert from the drop down to open it.
- Click ADD TO ALERT button.
- Select the vehicles that you want to add.
- Click DONE to save the changes.
How to delete an alert?

- Make sure you are on the Alerts page.
- Select an alert from the drop down to open it.
- Click REMOVE button.
- Click CONFIRM REMOVE to delete it.
How to add an alert to a group?
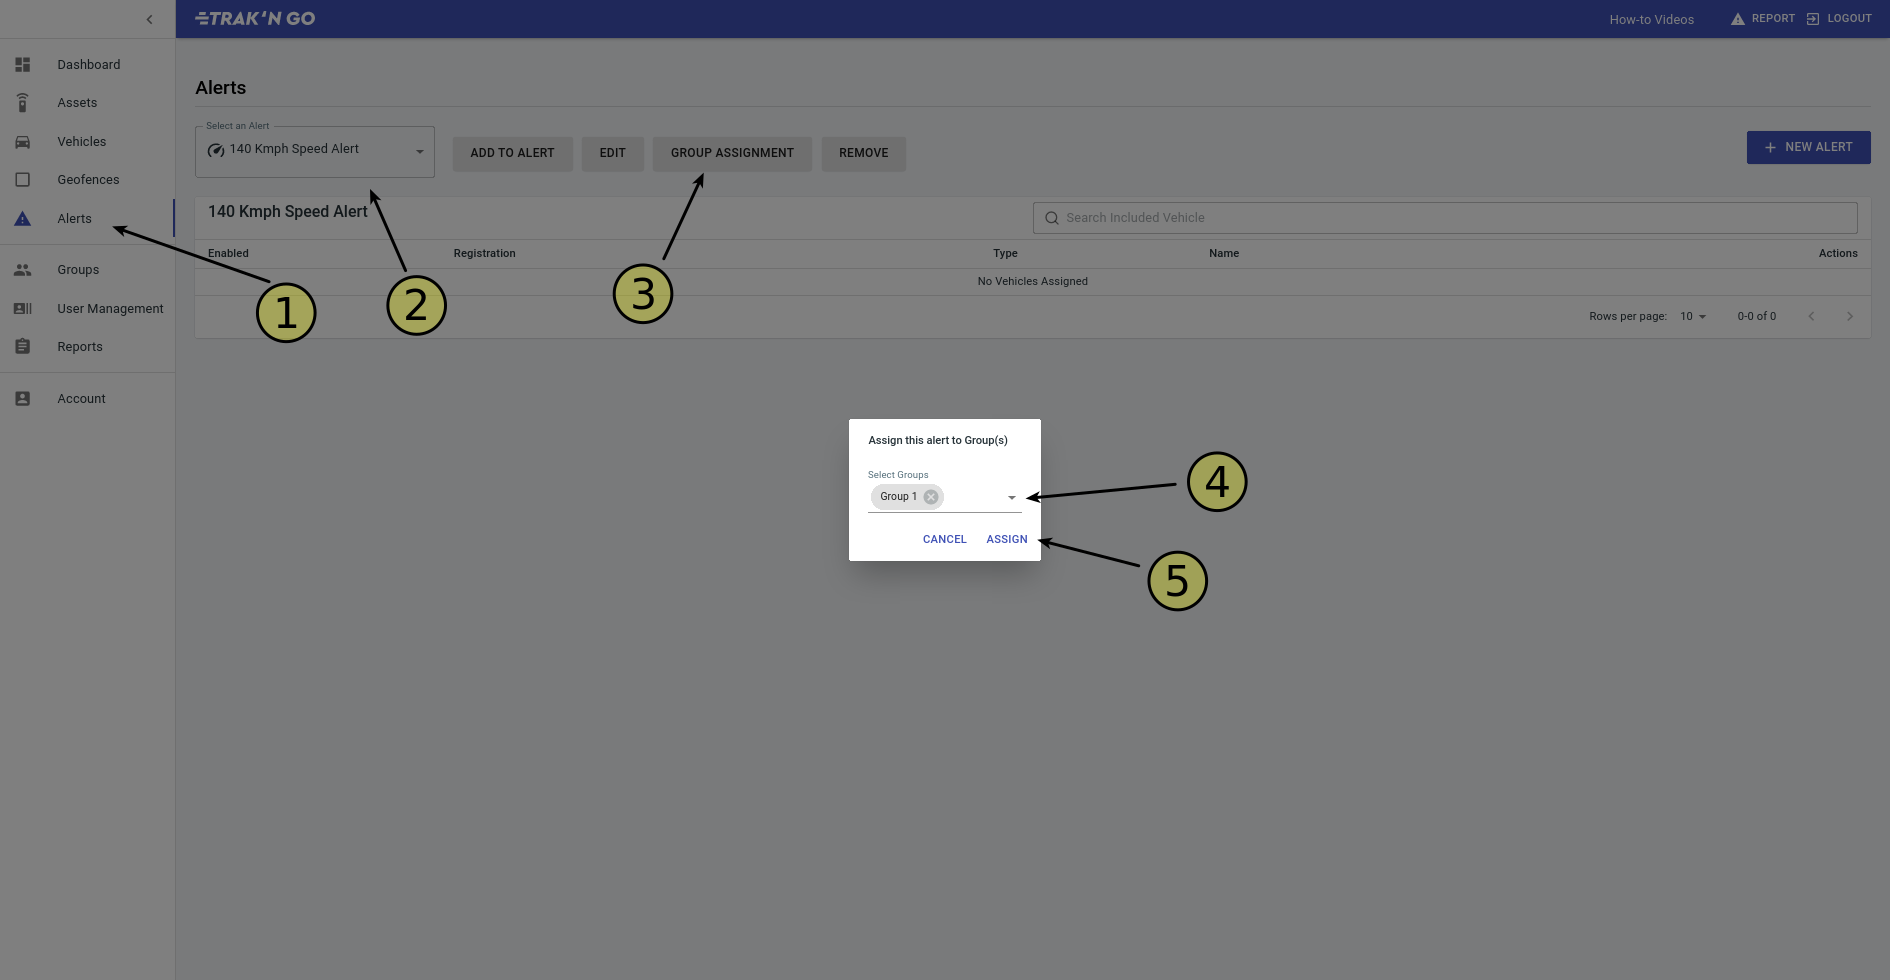
- Make sure you are on the Alerts page.
- Select an Alert from the drop down to open it.
- Click GROUP ASSIGNMENT button.
- Select the groups that you want the alert to be in.
- Click ASSIGN to save the changes.
How to edit an alert?
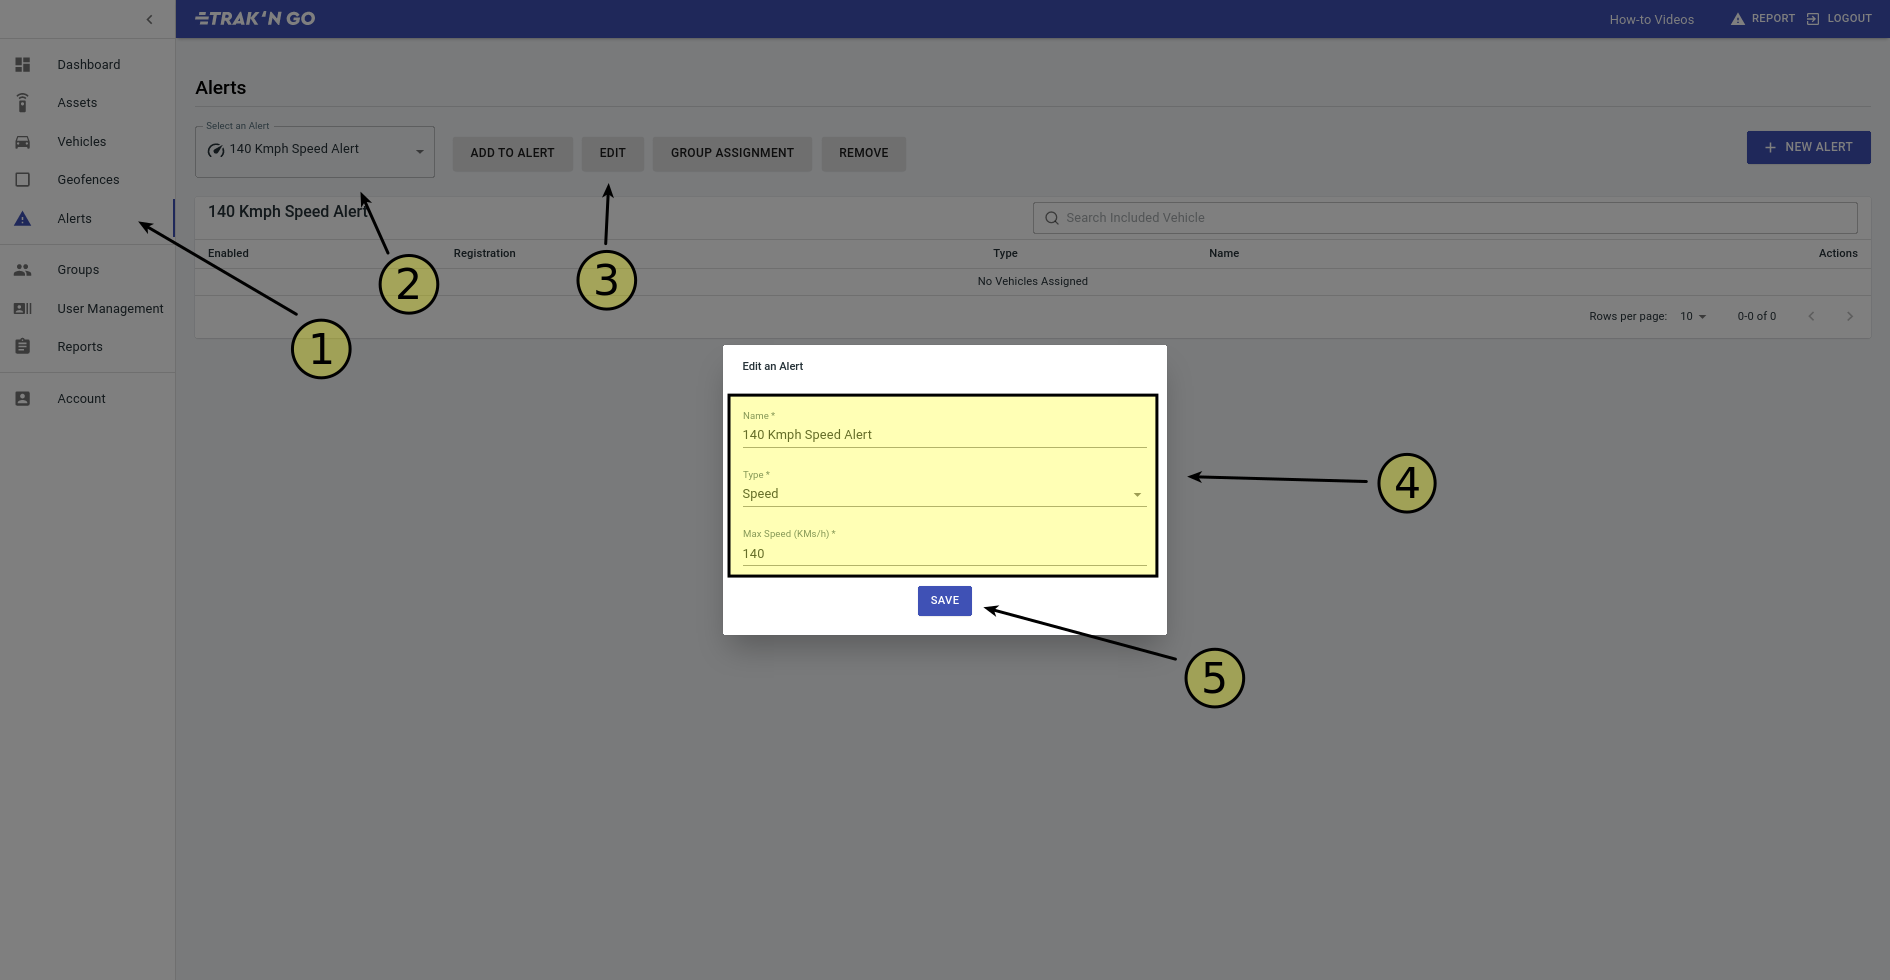
- Make sure you are on the Alerts page.
- Select an Alert from the drop down to open it.
- Click the Edit Button.
- Make the desired changes.
- Click SAVE to save the changes.
How to remove one vehicle from an alert?
Groups
What are groups?
Groups are way to setup authorisation in Trakngo. In simple terms, It is a way to show or hide vehicles, assets, geofences or alerts to relevant users.
Groups are like buckets. Any user in the bucket will be able to see other vehicles, assets, geofences and alerts in the same bucket. Buckets can have overlapping items e.g. one user can be in multiple buckets.
How to add users, vehicles, assets, geofences or alerts to a group?
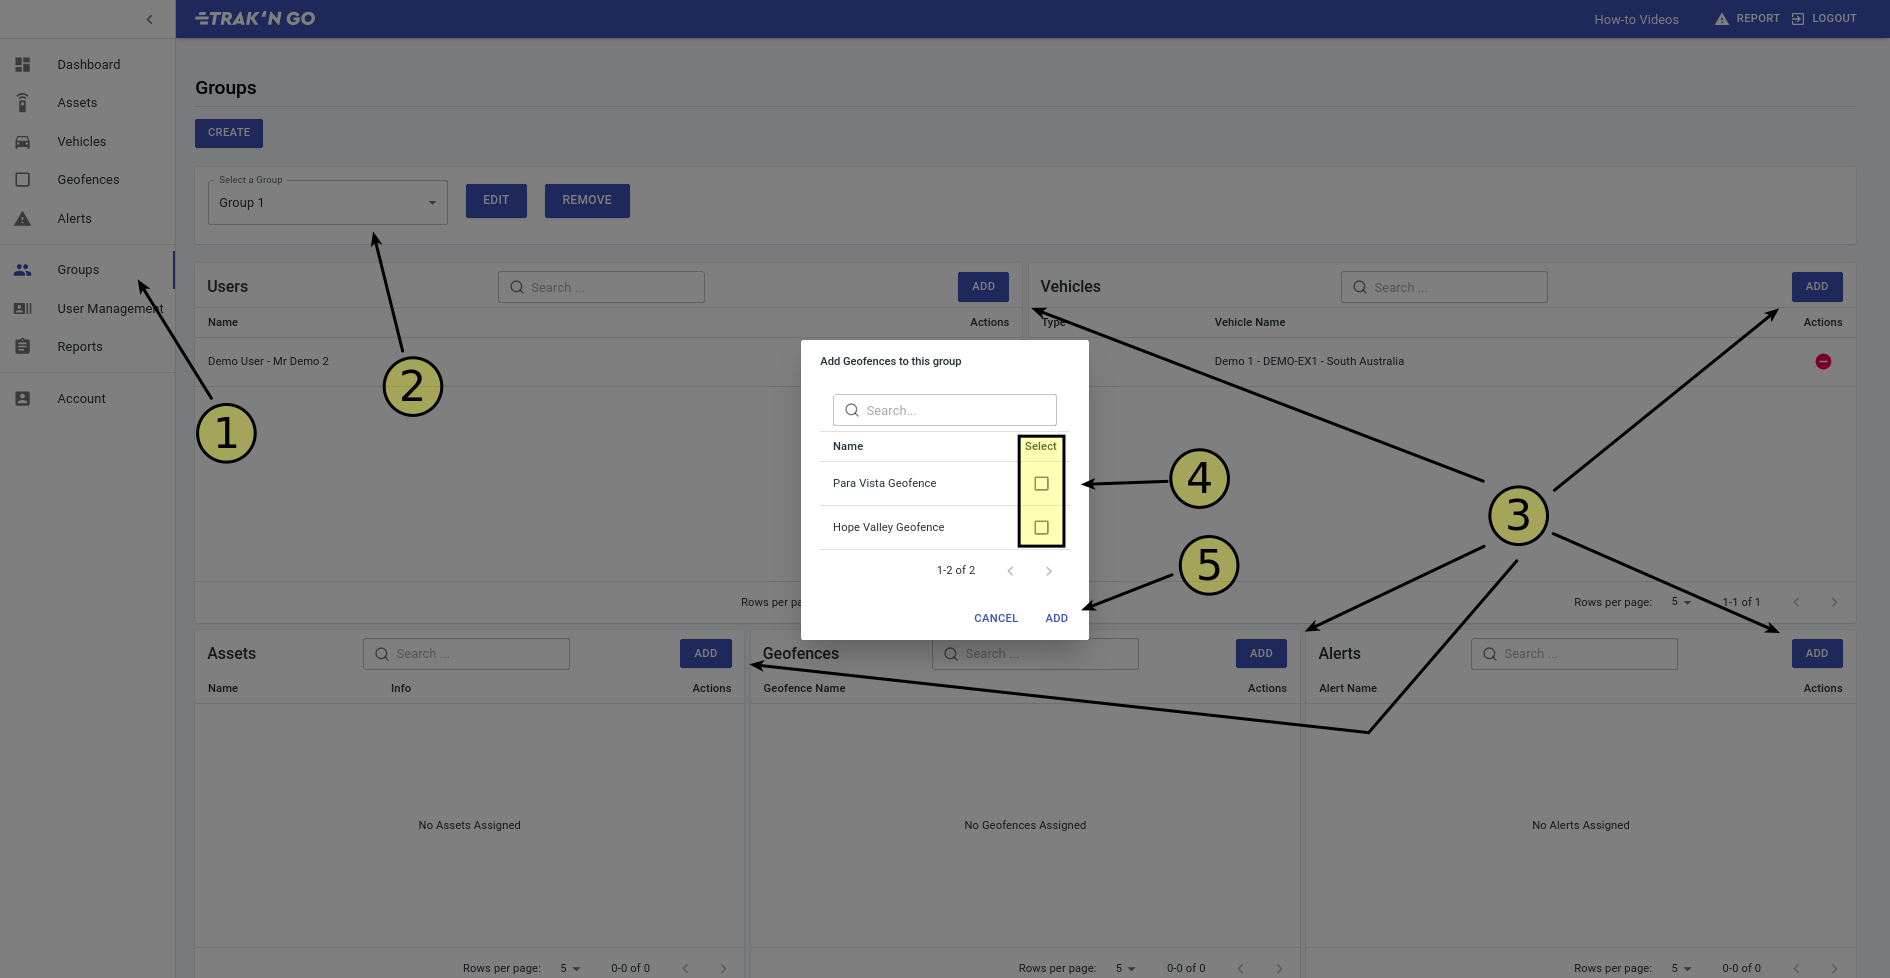
- Make sure you are on the Groups page.
- Select a group from the drop down to open it.
- Click on the appropriate ADD button for what you want to add to the group.
- From the pop up, check the items you want to add.
- Click ADD to save the changes.
User Management
How to add users or send an invite?
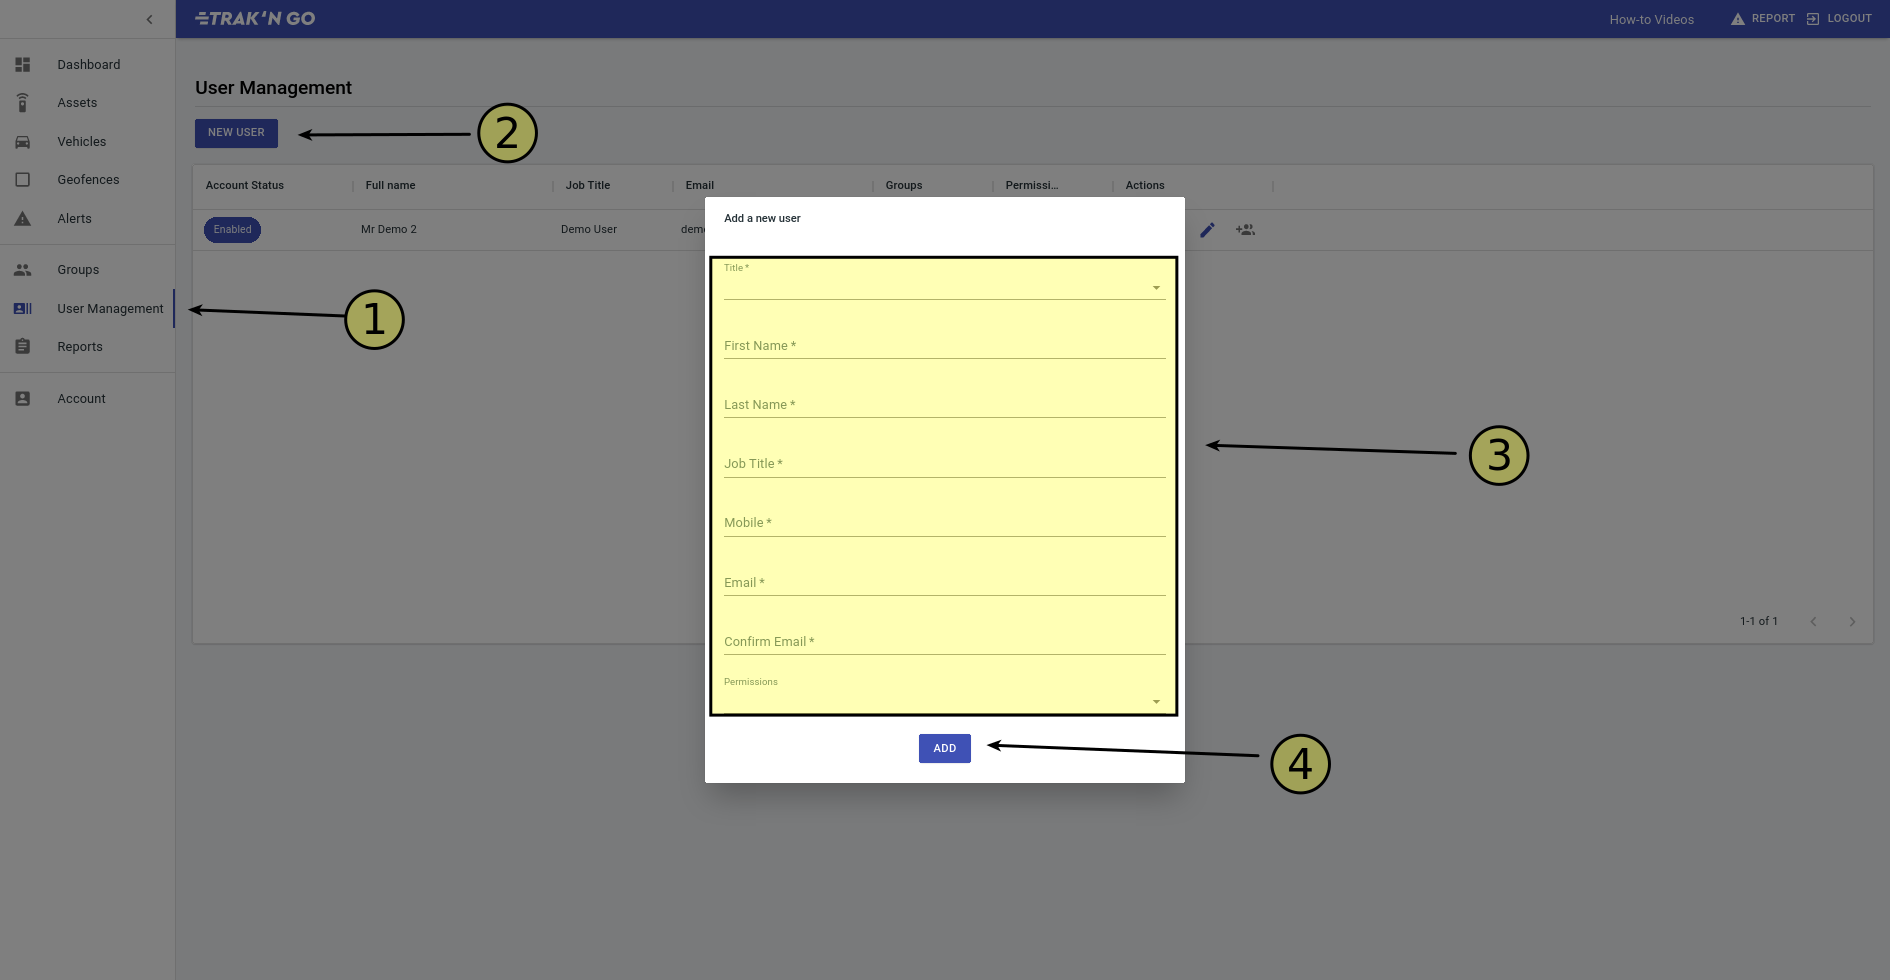
- Make sure you are on the User Management page. Only an Admin has access to this page.
- Click NEW USER button.
- Fill out the new user's details and what permissions they will have.
- Click ADD. The new user will receive a password reset email for their account.
How to change user's details?
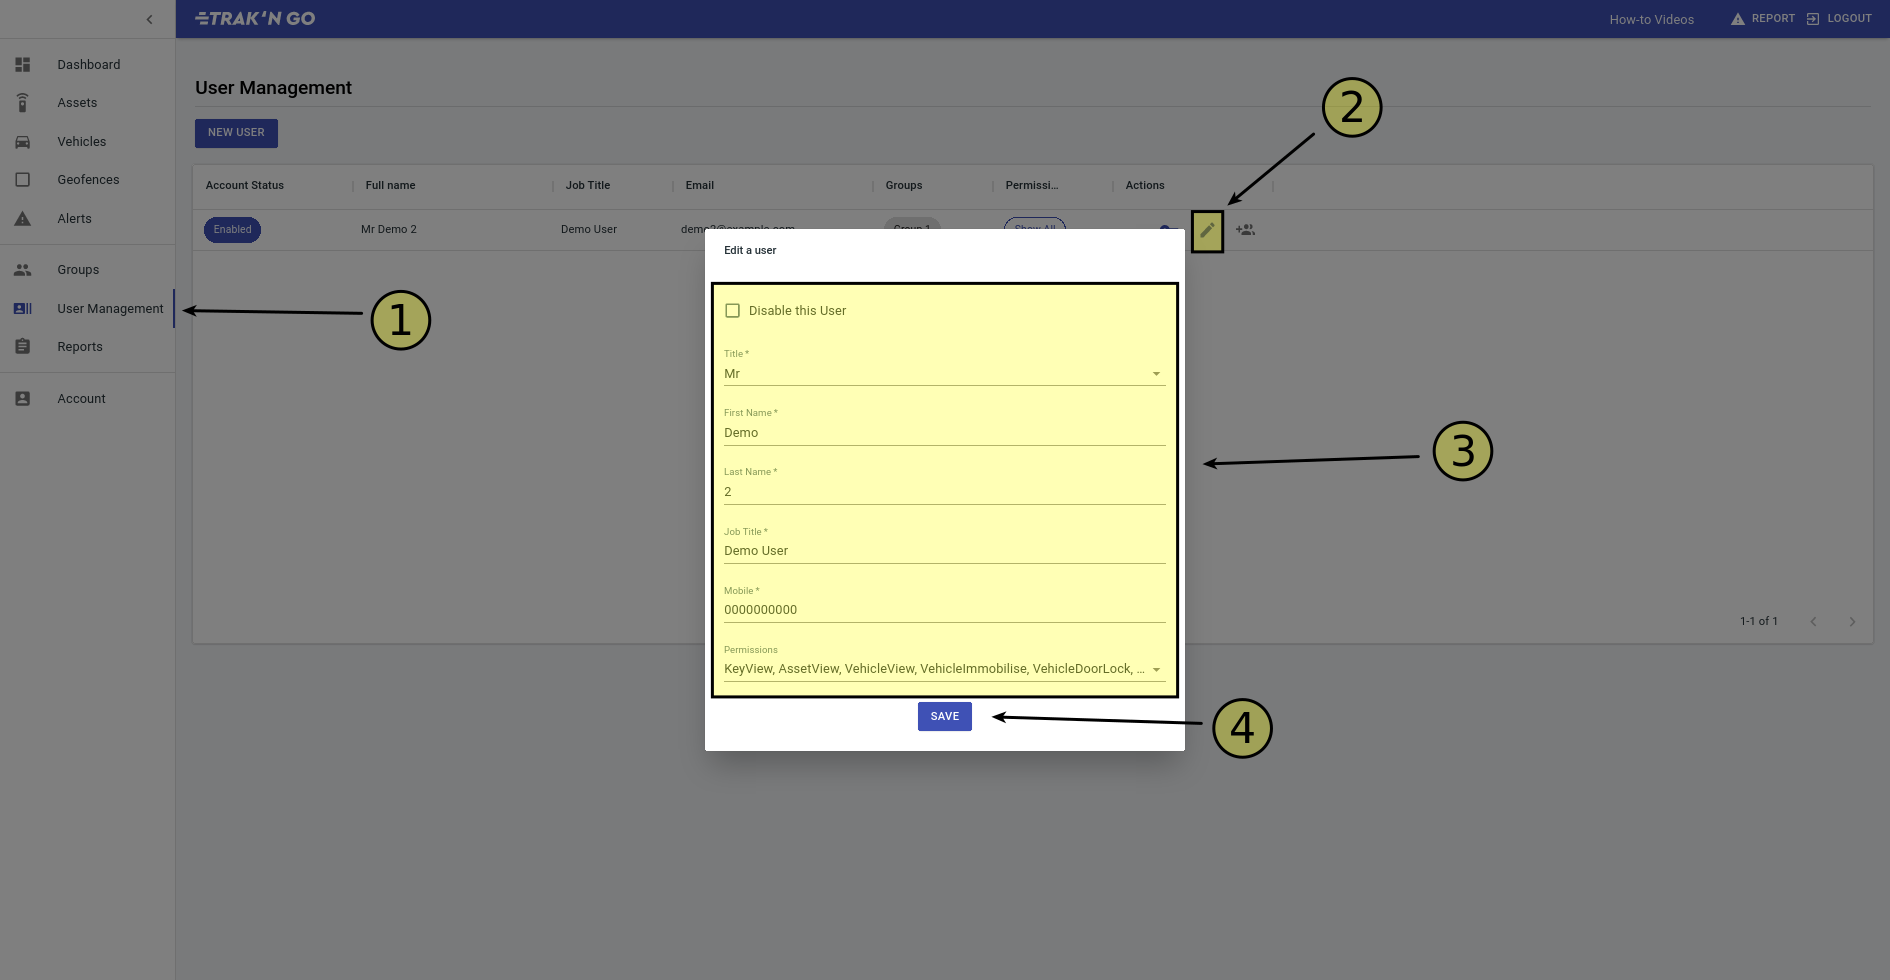
- Make sure you on the User Management page. Only an Admin has access to this page.
- Click Pencil icon for the user that you want.
- Make desired changes.
- Click SAVE to save the changes.
I send invite to wrong email, what do I do?
After a user has been created, their email can not change. Therefore, you should:
- Create a new user with the correct email.
- Disable the old user.
How to send a password reset email?
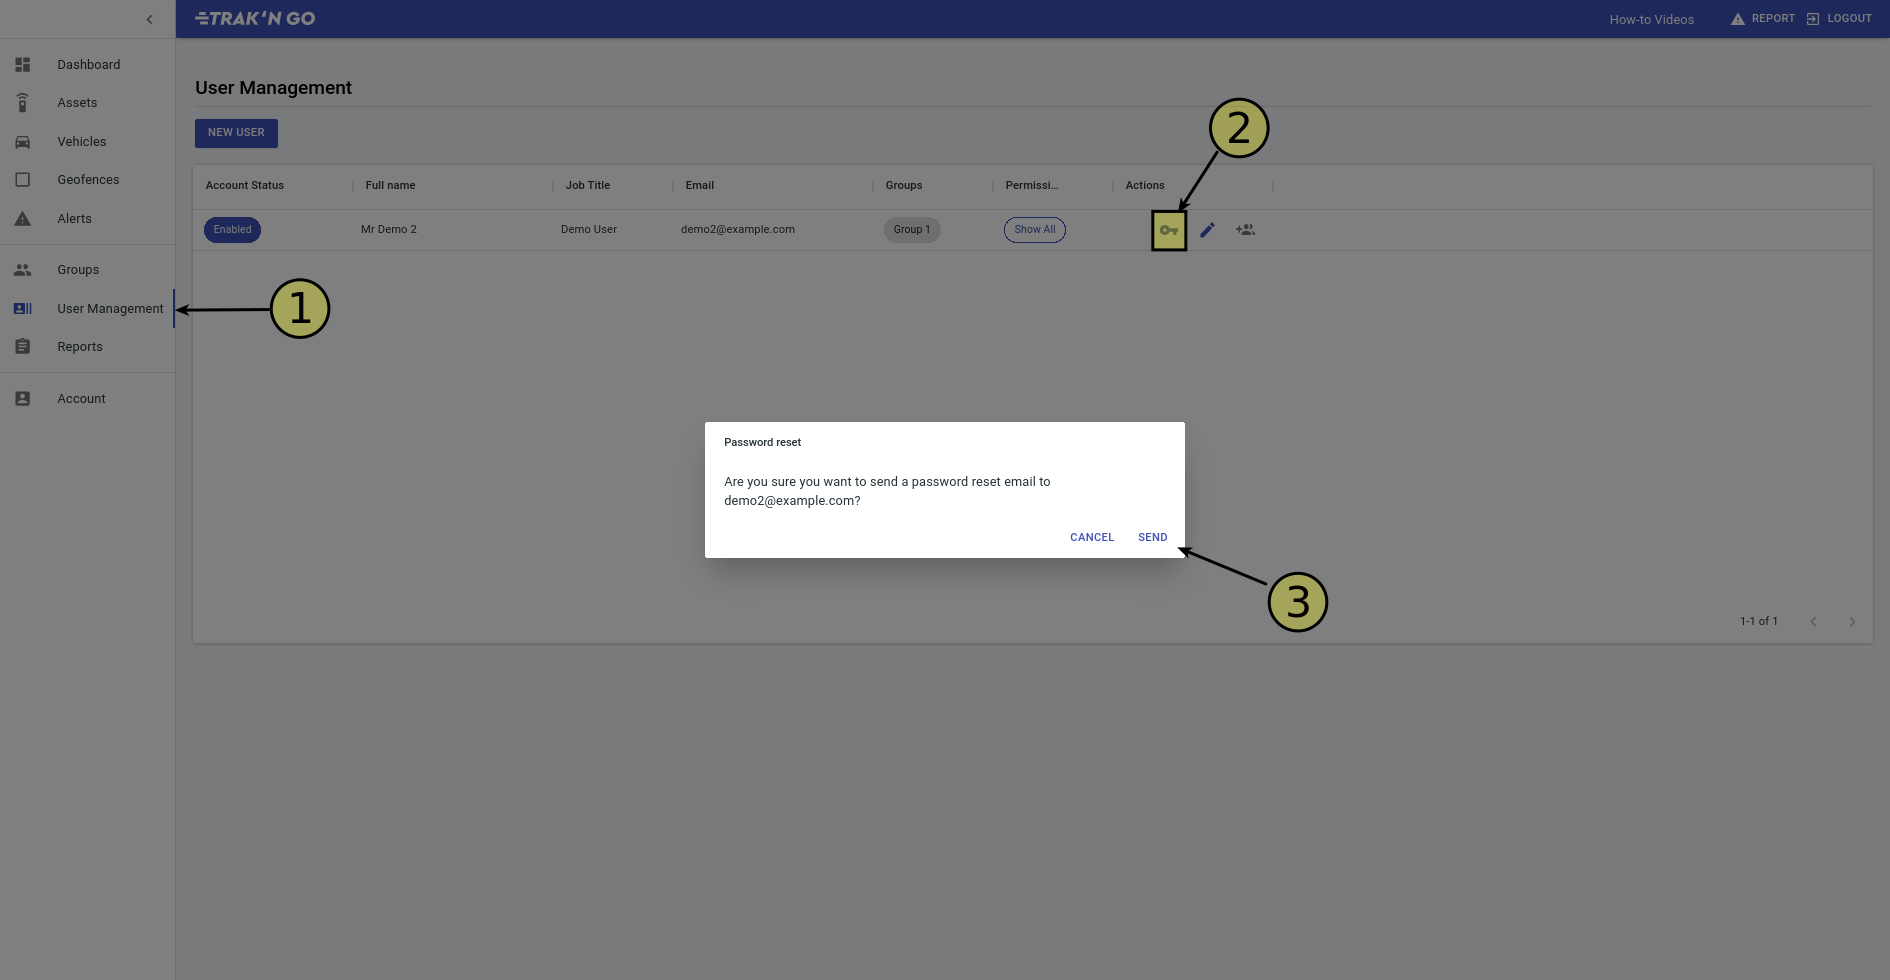
- Make sure you are on the user management page. Only an Admin has access to this page.
- Click on the key icon for the user that you want.
- Click SEND to send the password reset email.
How to add a user to a group?
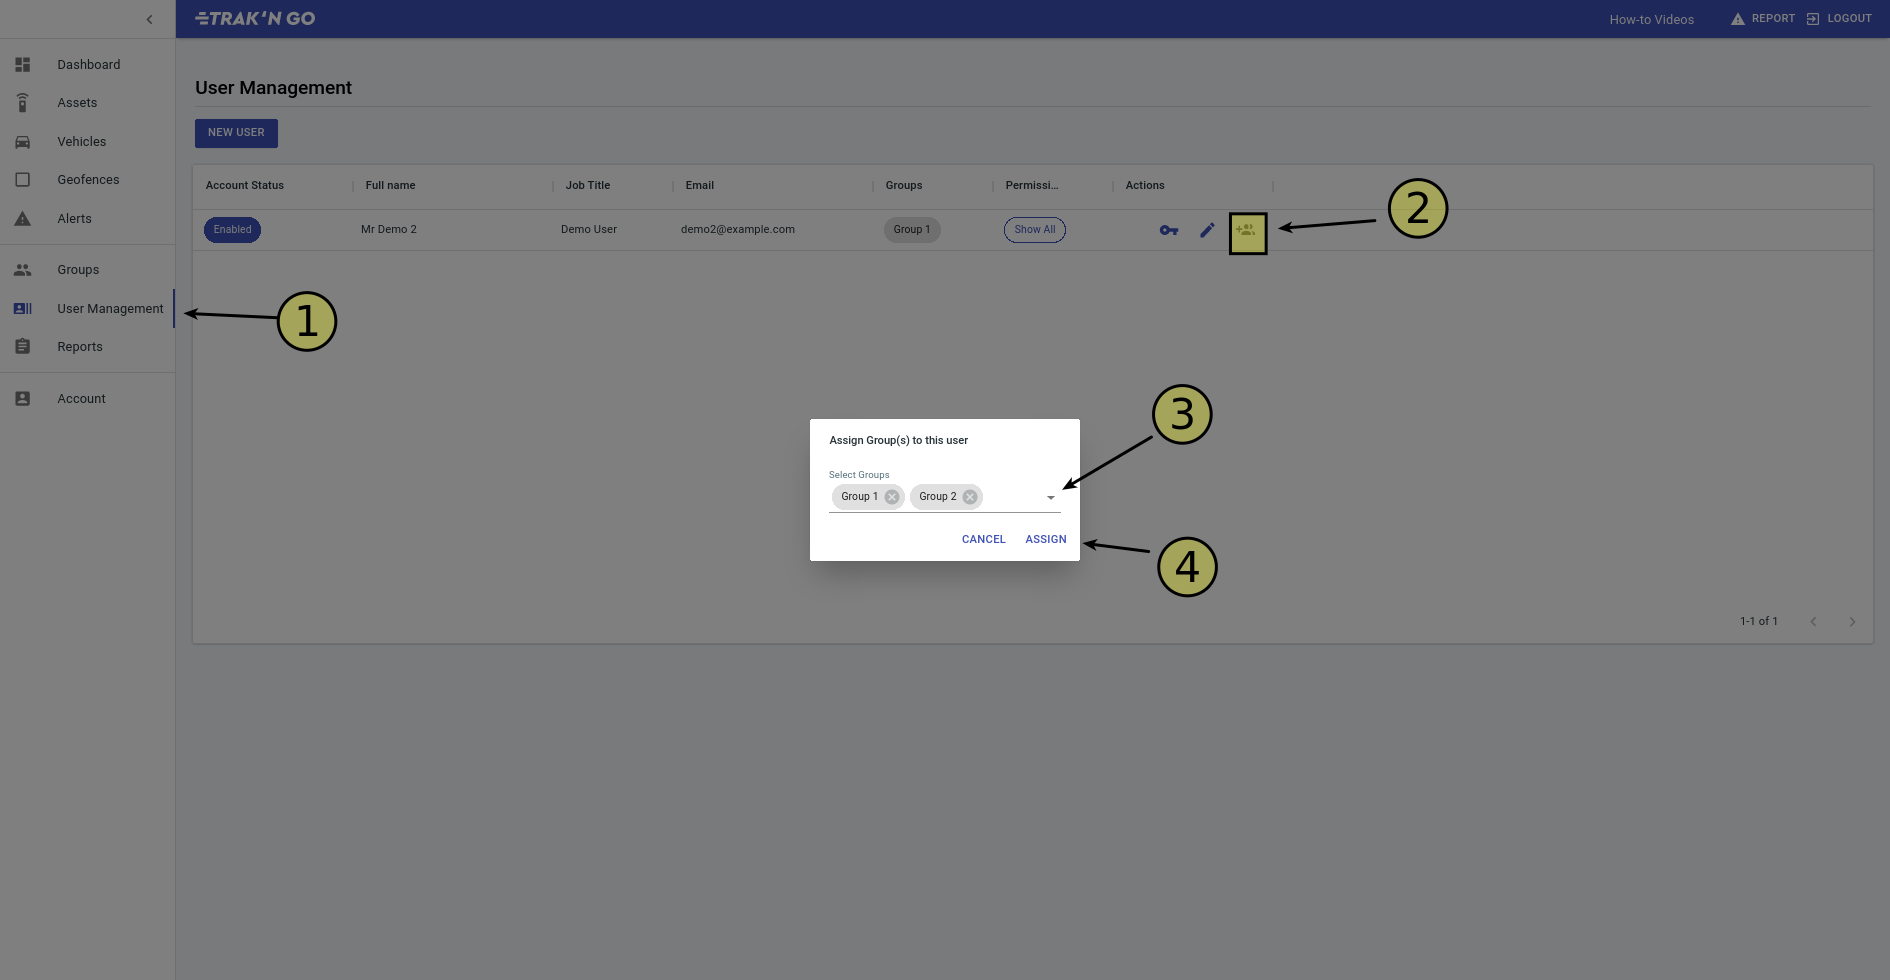
- Make sure you are on the User Management Page. You need to be an Admin in order to access this page.
- Click the indicated icon for the user you want to edit.
- Select the groups that you want to the user to be in.
- Click ASSIGN to make the changes.
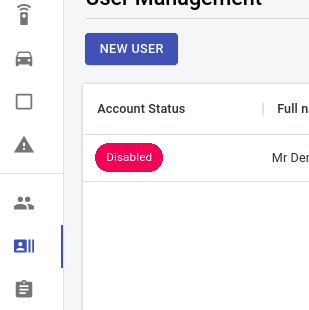
How to delete a user?
You can only disable access to users and cannot outright delete them. Here is how to disable them:
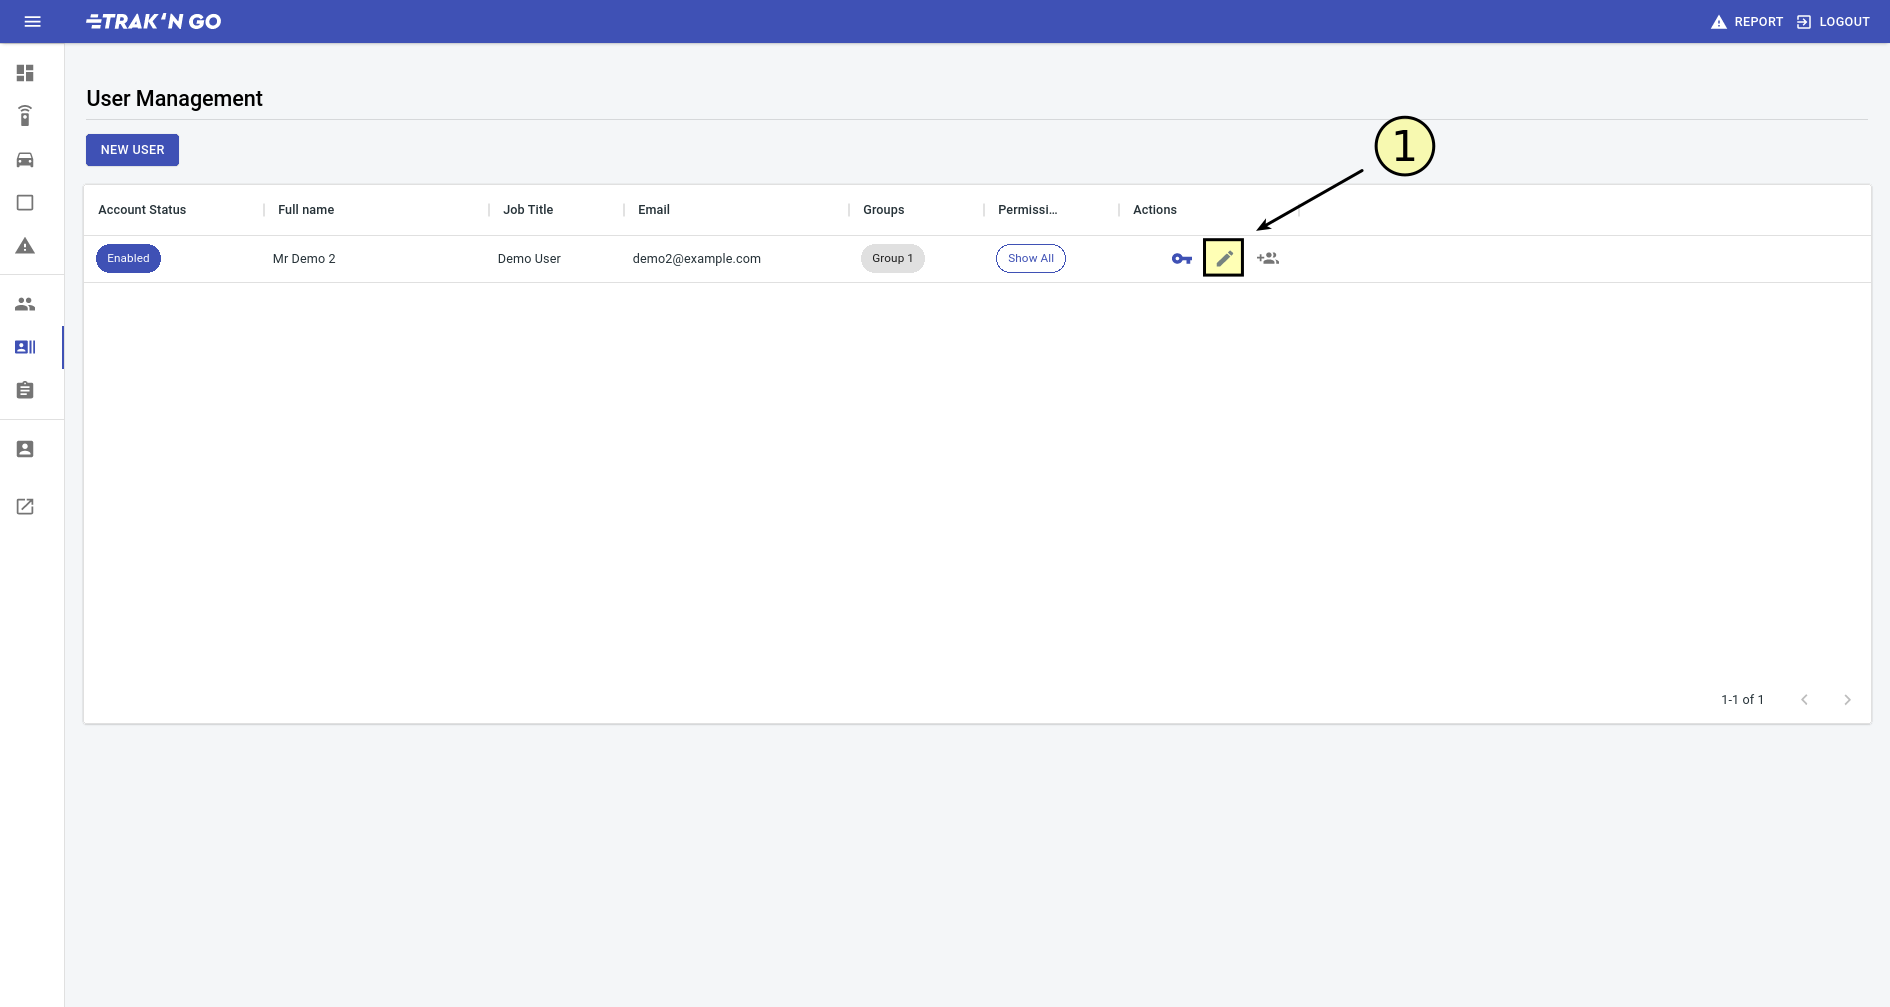
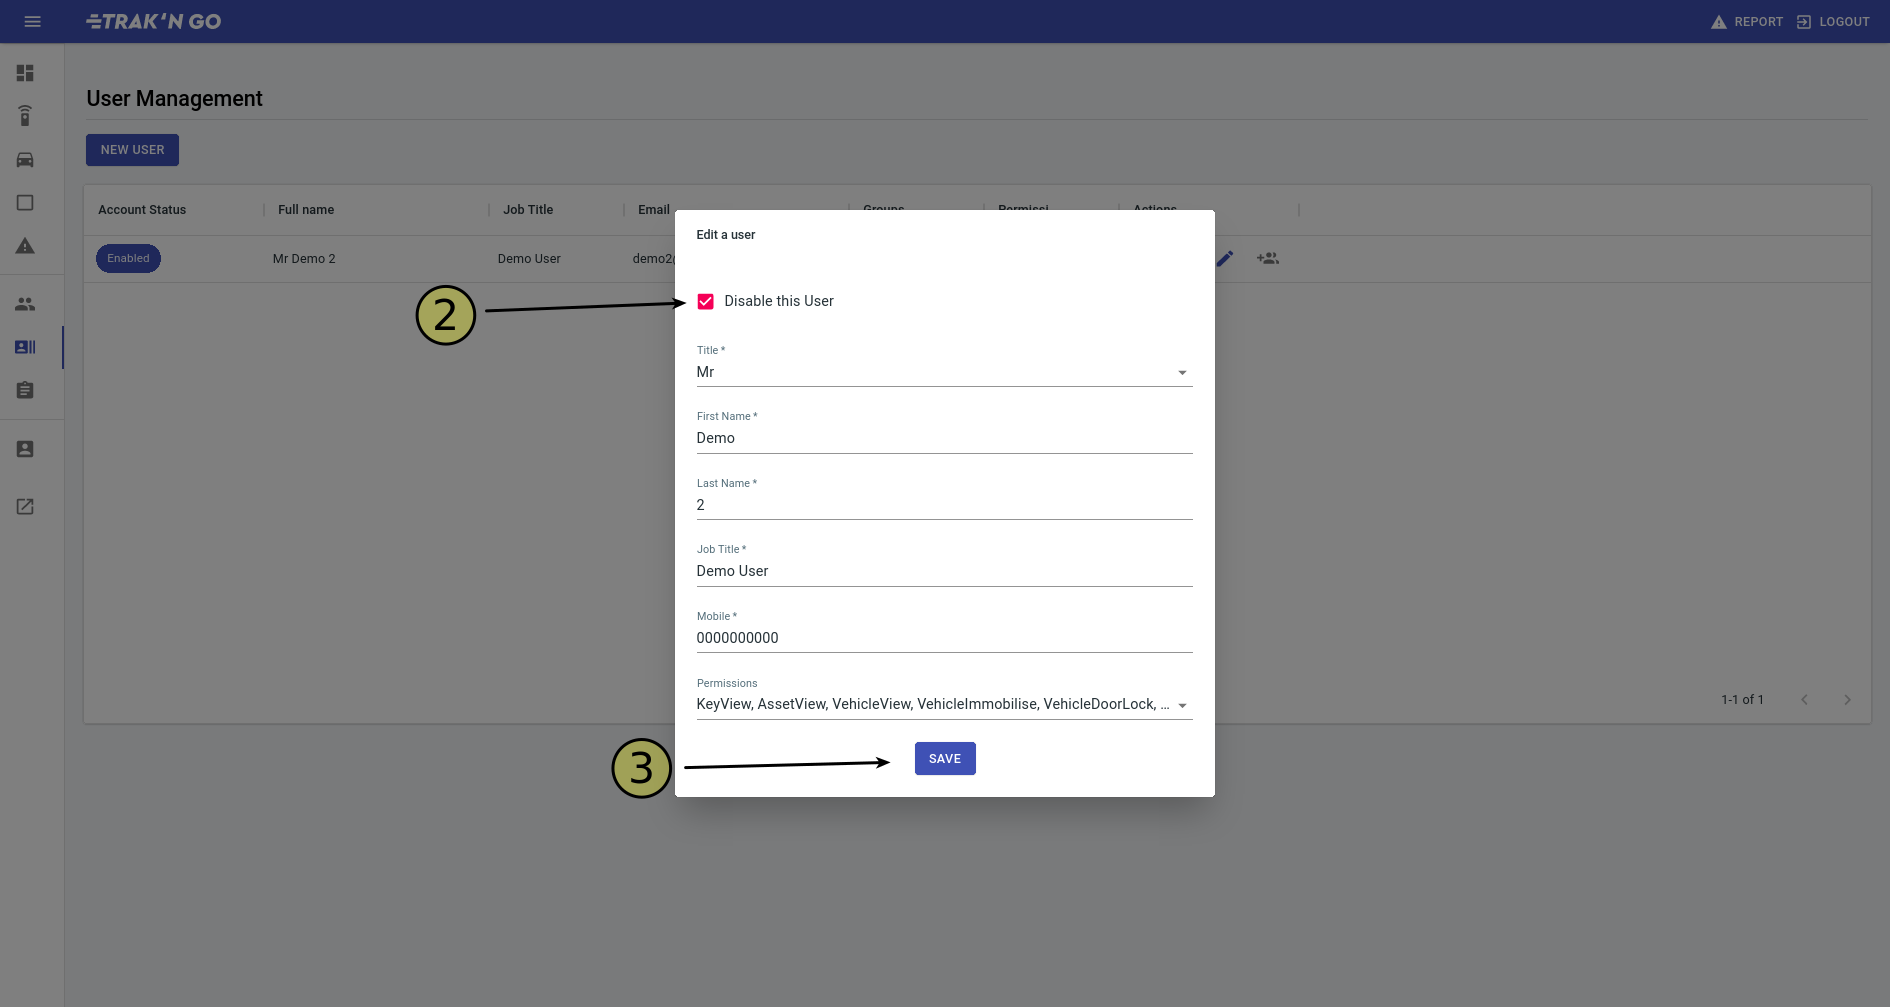
- Click the indicated pencil icon for user that you want to disable.
-
Click to enable the Disable this User checkbox.
- Click SAVE and you will see the user now marked as disabled.
Reports
How to export a report to pdf or csv?
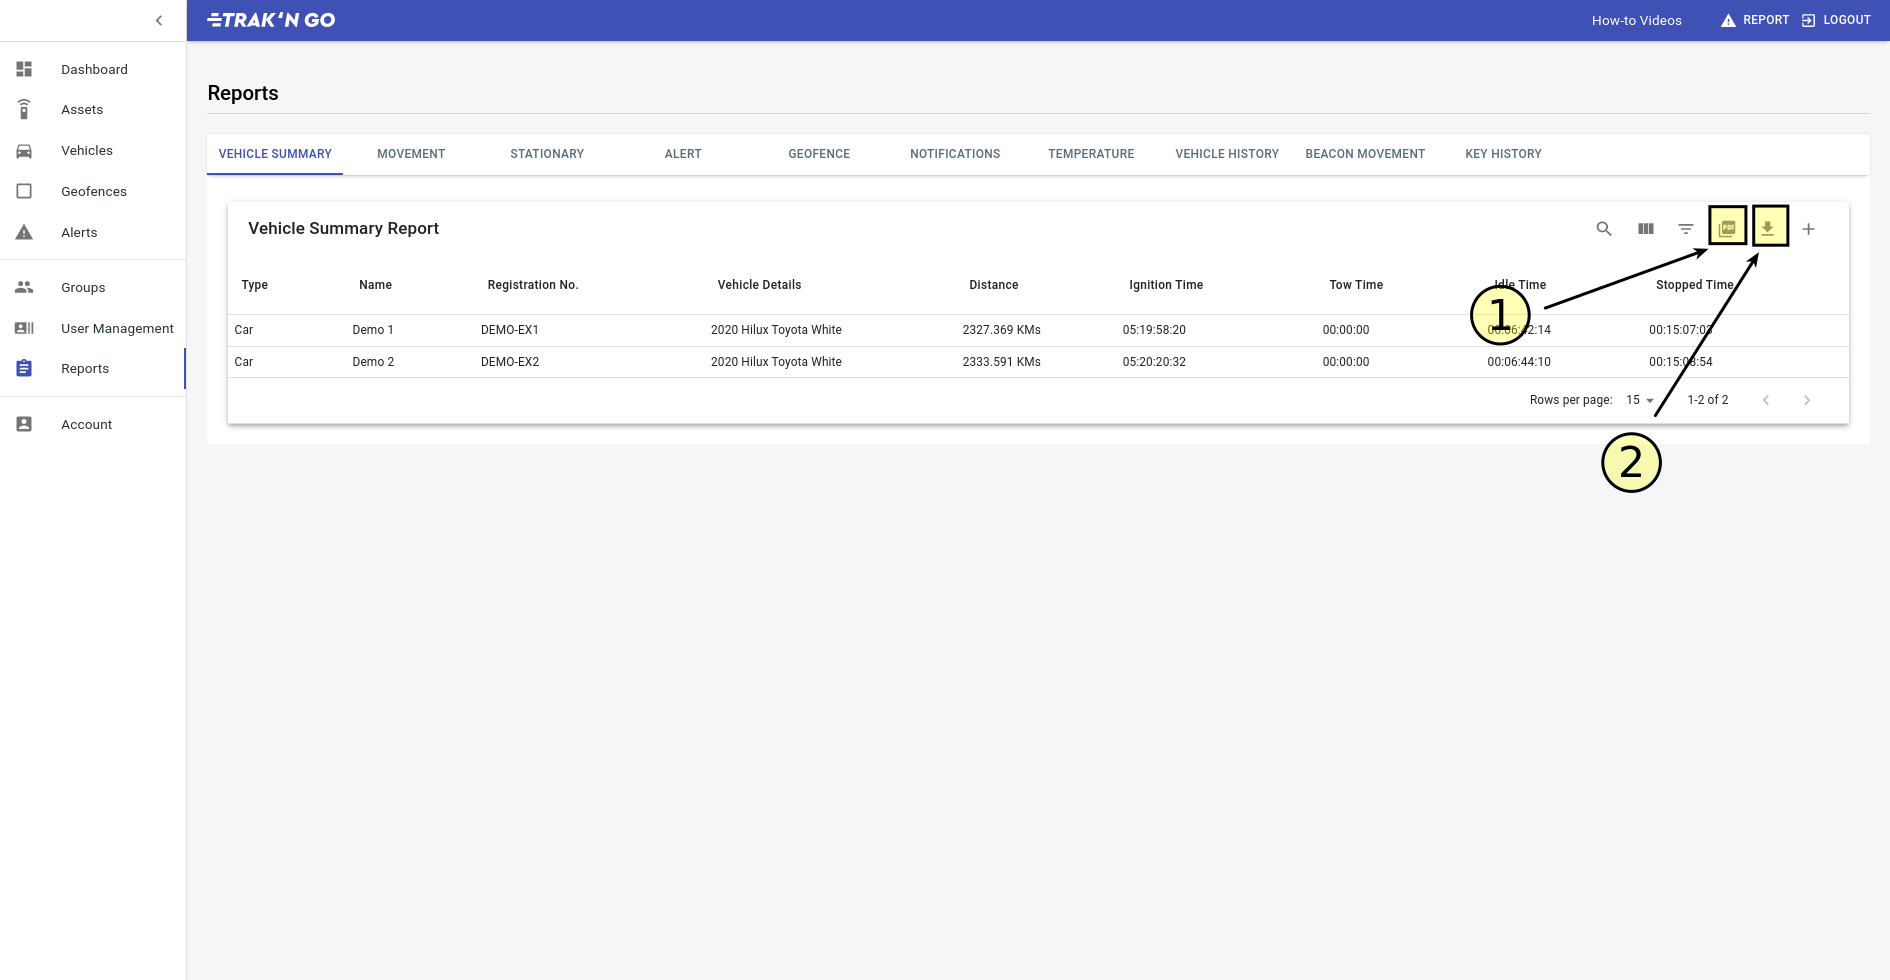
Generate a report first. Then
- Click this icon to export to PDF.
- Or Click this if you want to export to a csv.
For Temperature and Beacon Movement reports look for these buttons instead.
![]()
What is Vehicle Summary report?
Vehicle Summary report gives you the following information on vehicles between two dates:
- total distance
- total ignition time
- total tow time
- total idle time
- total stopped time
It is useful if you are looking for figures on:
- How much distance did a vehicle travel?
- How long was it driving/towed/idling/stopped for?
What is a Movement Report?
Movement report gives you all the driving and towed events for a vehicle. The movement report gives you the following information on these movement events:
- Movement type
- Movement time
- Start location
- Stop location
- Total distance covered by the movement
- Total duration of the movement
- Logbook notes
It is useful if you are looking for:
- All movement events for a vehicle
What is a Stationary Report?
Stationary report gives you all the idle and stopped events for a vehicle. The stationary report gives you the following information on these stationary events:
- Stationary type
- Stationary time
- Location
- Total duration of the event
- Logbook notes
It is useful if you are looking for:
- All stationary events for a vehicle
What is a Alert Report?
Alert report gives you all notifications generated by an alert being triggered. The report will give:
- Time alert was triggered
- Vehicle details that triggered the alert
- Location of the vehicle when the alert was triggered
It is useful if you are looking for:
- All the vehicles that have triggered one alert.
What is a Geofence Report?
Geofence report gives you all notifications generated by a geofence being triggered. The report will give:
- Time geofence was triggered
- Vehicle details that triggered the geofence
- Whether geofence was entered or exited
- Location of the vehicle when the geofence was triggered
It is useful if you are looking for:
- All the vehicles that have triggered one geofence.
What is a Notifications Report?
Notifications report gives you all notifications generated by a vehicle(geofences or alerts). The report will give:
- Time notification was created
- Details of alert or geofence
- Timeslot of geofence (if notification was of a geofence)
- Location of the notification
It is useful if you are looking for:
- All the alerts or geofences that have been triggered by vehicle
What is a Temperature Report?
Note: This report requires temperature probe to be installed.
Temperature report gives you a temperature graph for a vehicle.
What is a Vehicle History Report?
Vehicle history report is primarily for knowing when the vehicles were added to your account.
How to generate a report?
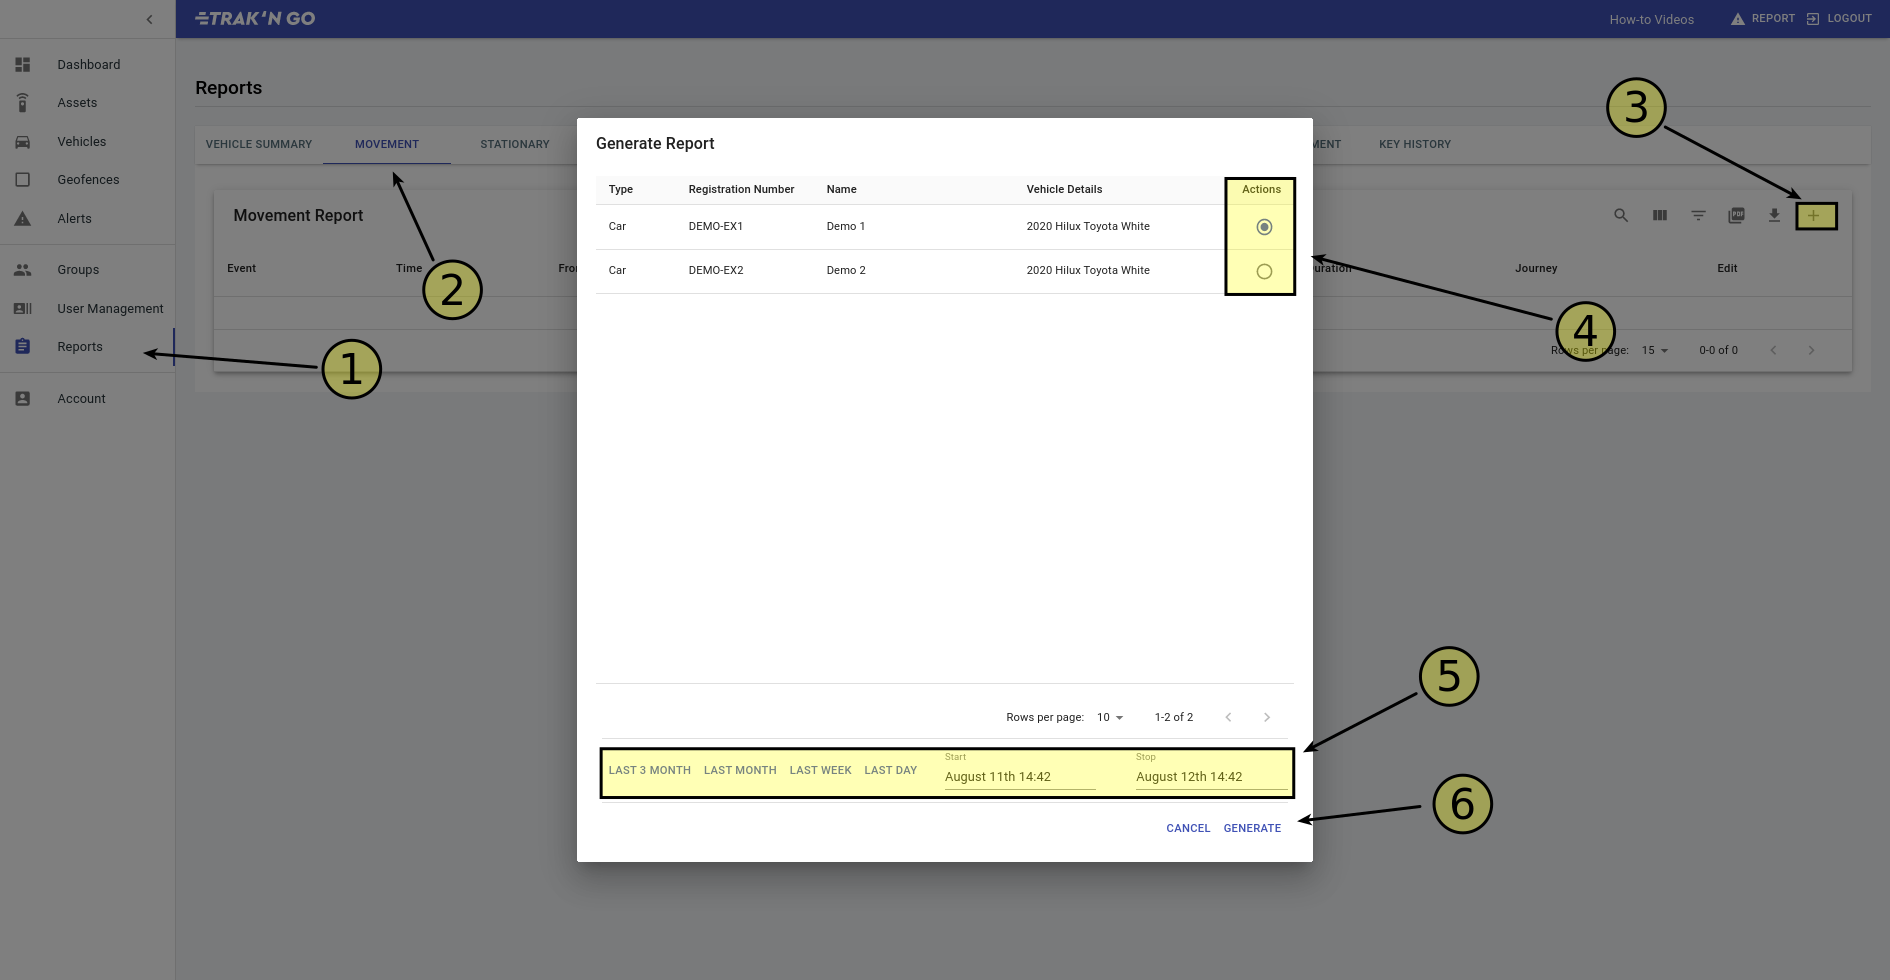
- Make sure you are on the Reports page.
- Make sure you are on the appropriate tab for the report that you are after.
- Click the indicated + button.
NOTE - For Temperature and Beacon Movement report, click the following button instead.
- Select one vehicle for the report.
NOTE - For Vehicle Summary report, you can select multiple vehicles.
NOTE - For Vehicle History report, this step is skipped. - Select a start and stop time. You can also use the quick fill buttons for this.
- Click GENERATE to create the report.
How to filter results of a report?
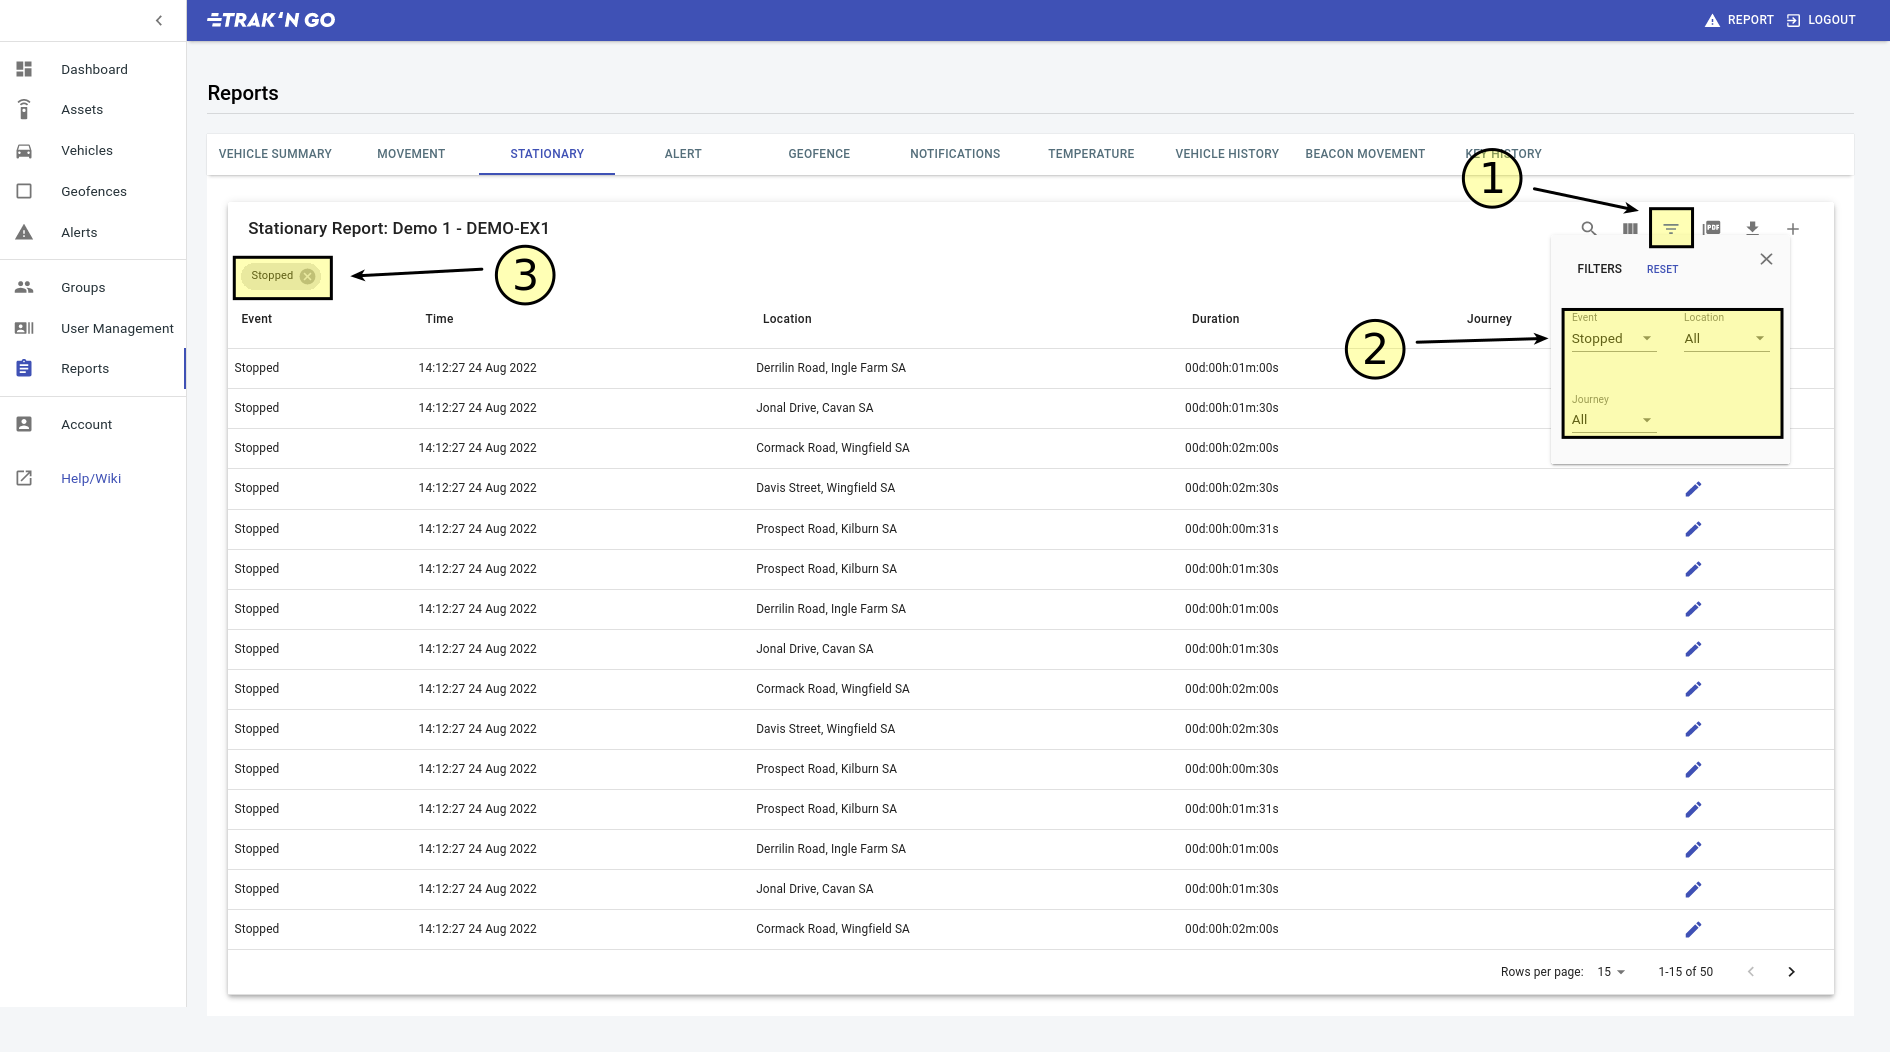
After you have generated a report.
- To apply a filter, click the indicated button.
- Select from the provided filter. The results will be instantly filtered.
- You will see the applied filters here.
Account
How to set your notification preferences?
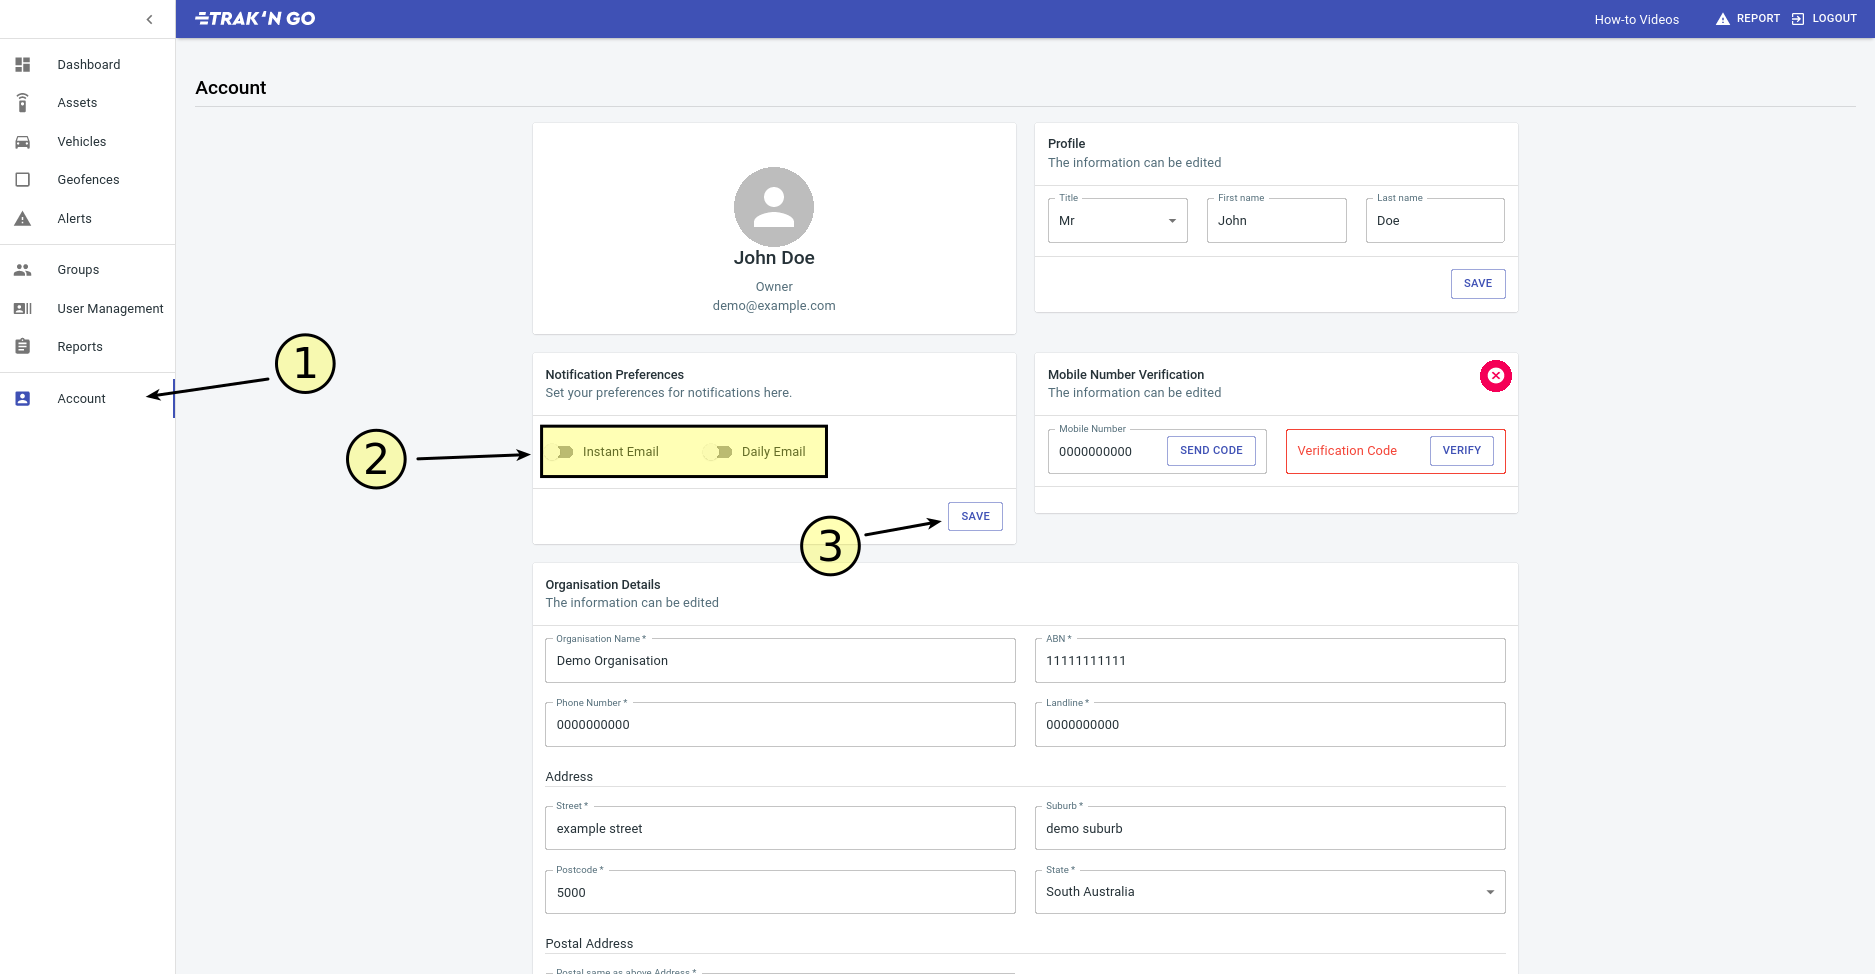
- Make sure you are on the Account Page.
- Configure the settings using the toggles.
- Click SAVE to save the changes.
How to verify your mobile number?
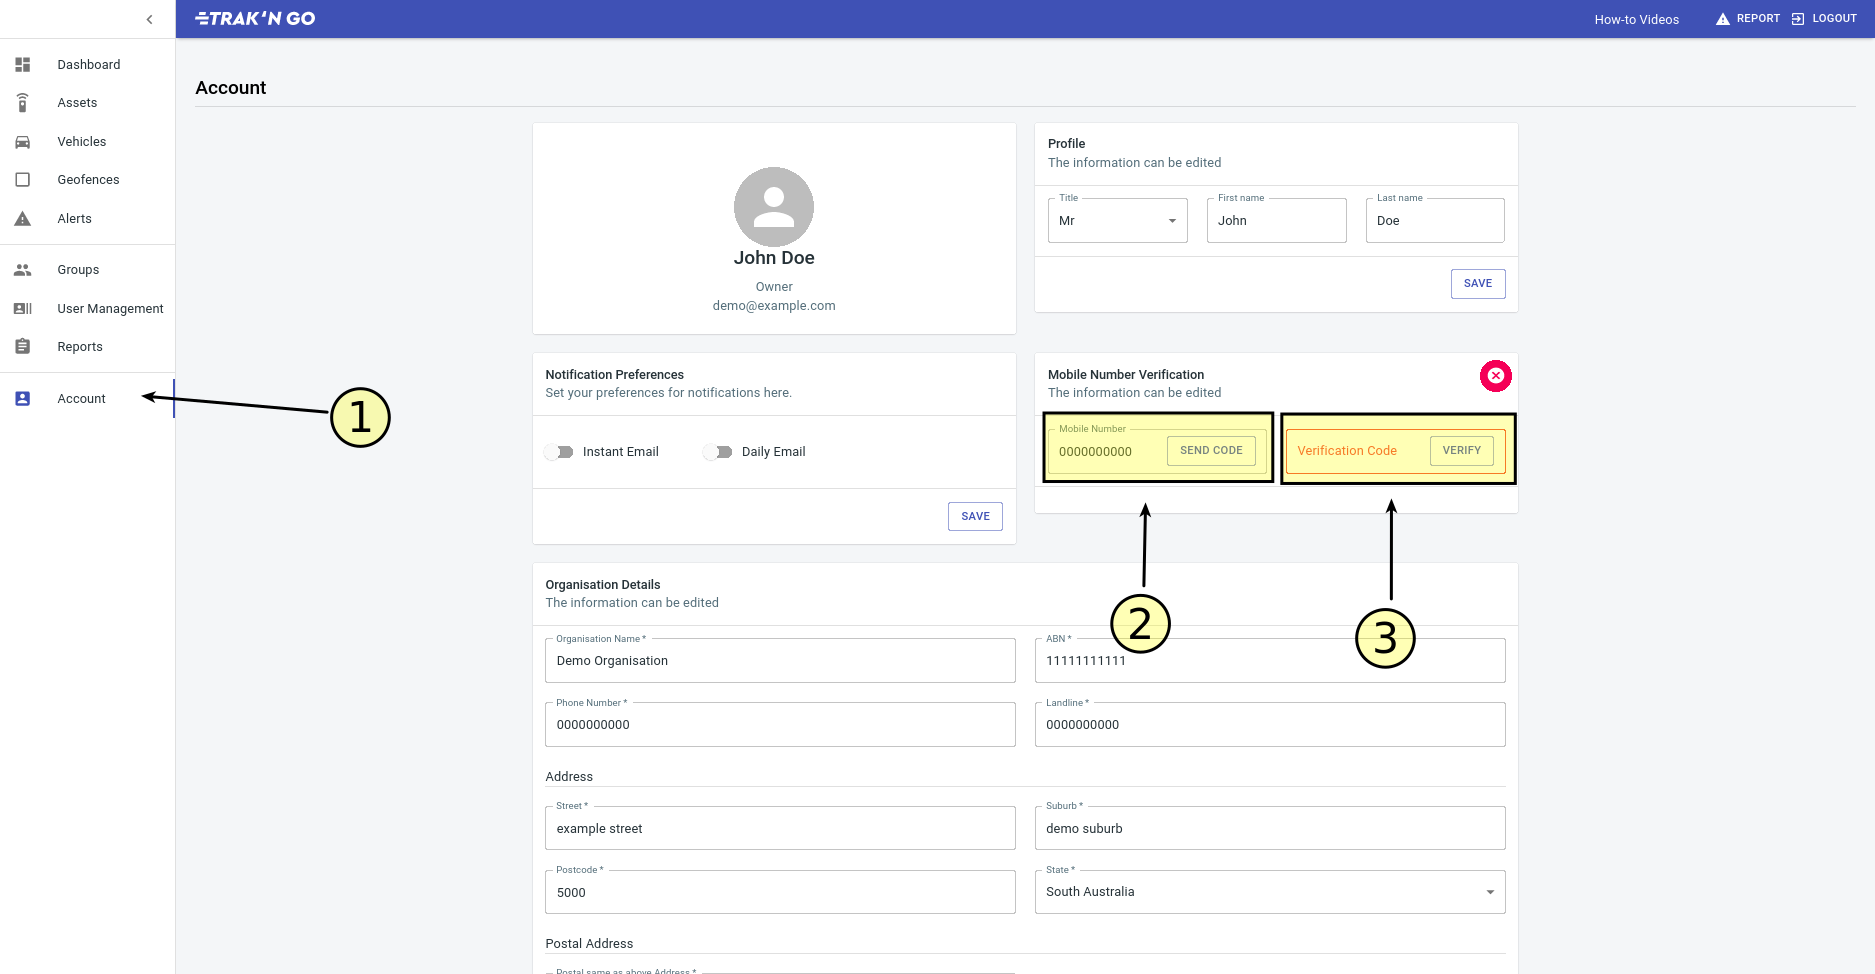
- Make sure you are on the Account page.
- Enter your phone number and click SEND CODE. This will send you a verification code via sms.
- Enter the verification code and then click VERIFY to finish the process.
How to change company details including address and postal address?
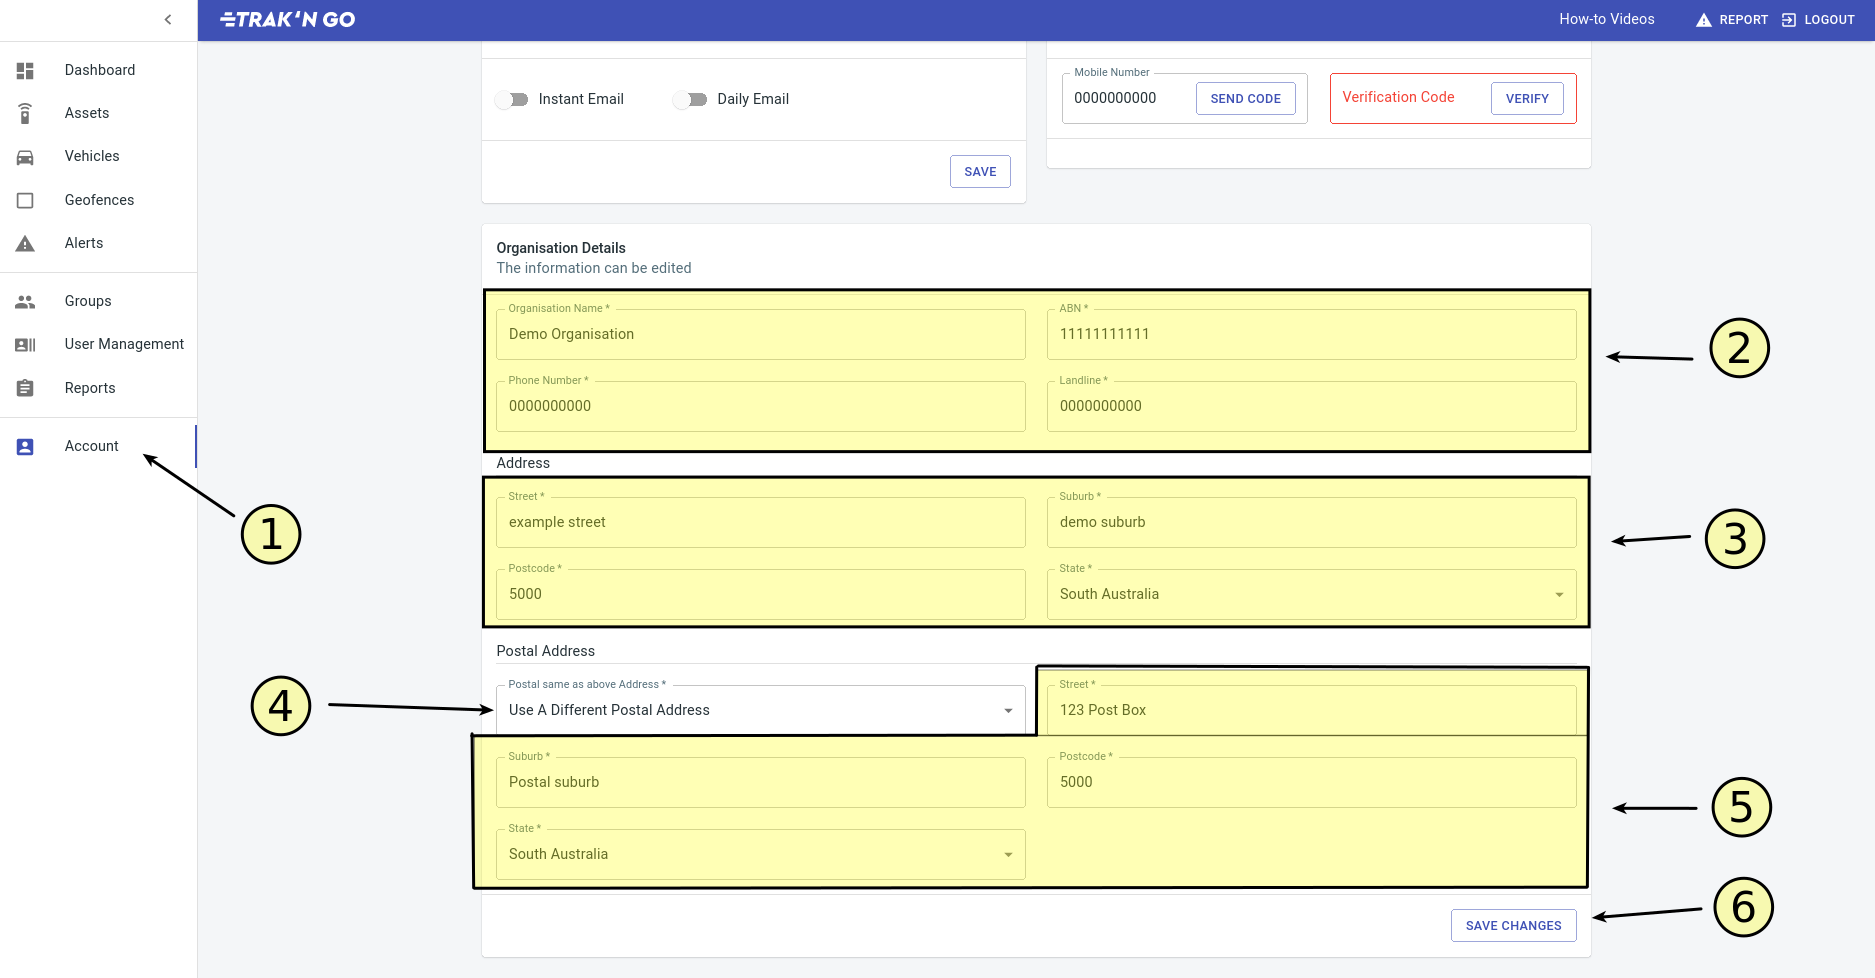
- Make sure you are on the Account page.
- Here you can make changes to the company details.
- Here you can make changes to the address.
- Use the drop down to select whether your postal address is the same as the address above.
- Here you can make changes to the postal address.
NOTE - This is only visible if you select 'Use A different Postal Address' in previous step. - Click SAVE CHANGES to make the changes.
FAQ
How to show or hide all vehicles/geofences/assets from the map?
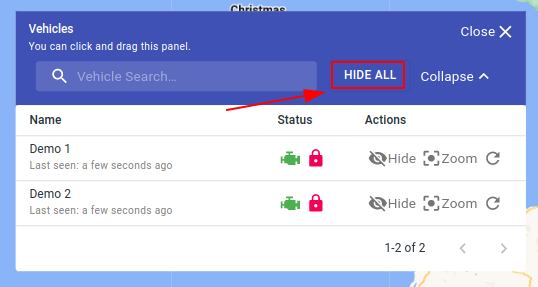
Look for the the "SHOW ALL" or the "HIDE ALL" on the appropriate vehicle/geofence/asset floating panel.
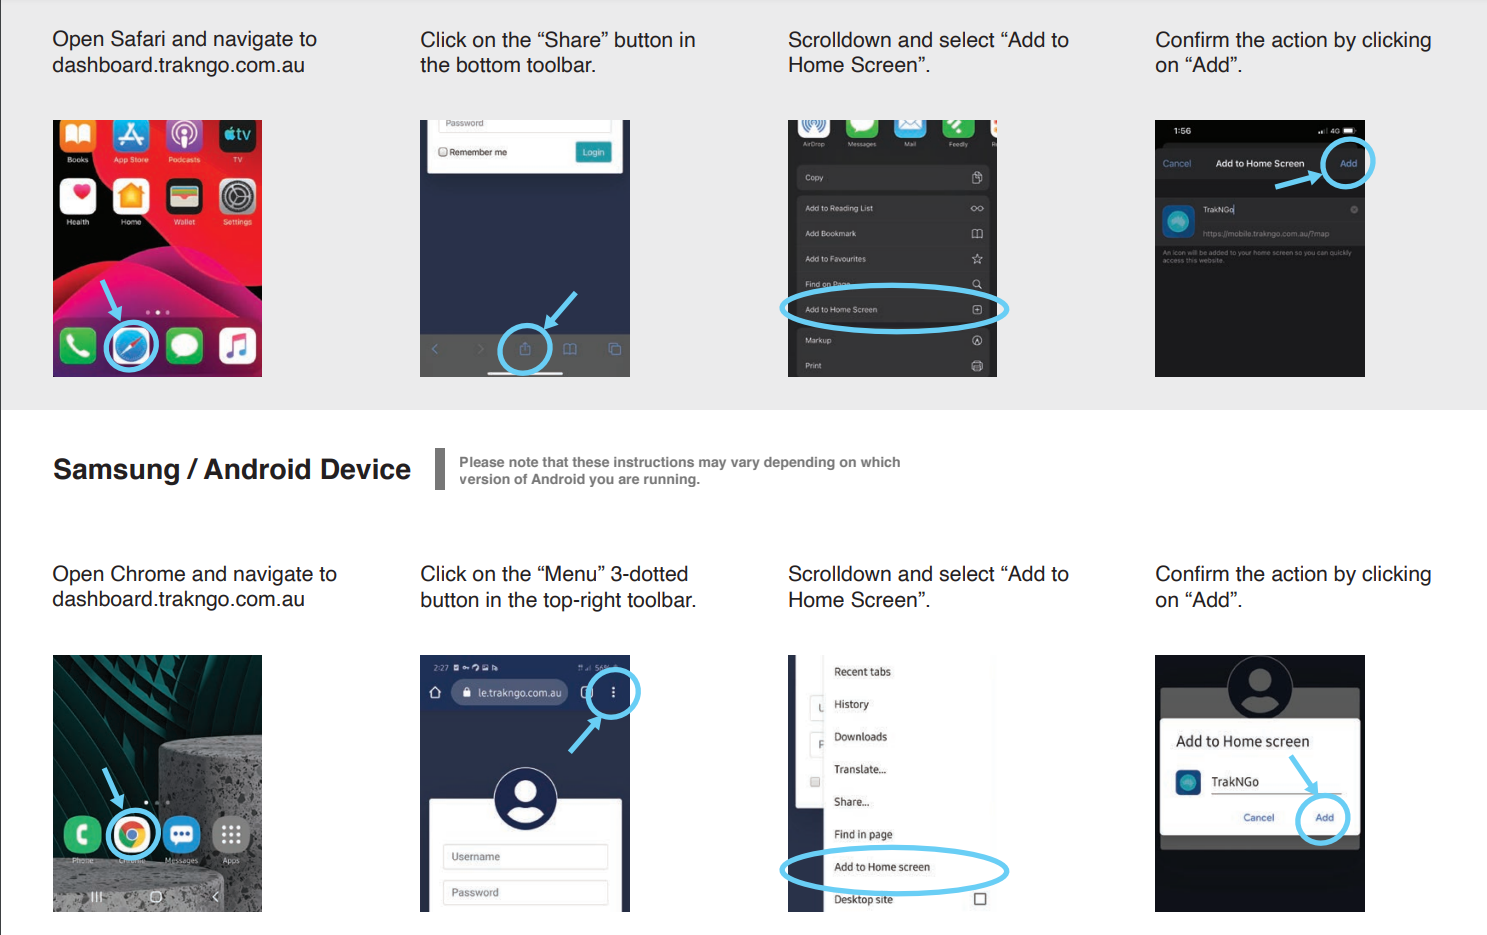
How to add the website to your mobile's home screen?